Assuming that you want to test a class called Parser. The following are the general steps to use the CppUnit framework to test this class:
#ifndef Course_h
#define Course_h

#include <string>

class Course {
 public:
  // Default constructor
  Course();

  // Constructor
  Course(std::string nm, int gr);

  // method to get the name of the course
  std::string getCourseName();

  // method to get the grade of the course
  int getCourseGrade();

 private:
  std::string course_name;      // name of this course
  int grade;                    // grade of this course
};
#endif
#include "stdafx.h"
#include "Course.h"

// default constructor
Course::Course() {
  course_name = "";
  grade = -1;
}

// constructor
Course::Course(std::string nm, int gr):course_name(nm) {
  grade = gr;
}

// method to get the name of the course
std::string Course::getCourseName() { return course_name; }

// method to get the grade of the course
int Course::getCourseGrade() { return grade; }
#ifndef Student_h
#define Student_h

#include <iostream>
#include <string>
#include "Course.h"

const int MAXNUM = 20;     // Maximum number of courses allowed per student

class Student {
public :
  // Constructor
  Student(std::string nm, std::string no);

  // Method to return student's name
  std::string getStuName();

  // Method to return student's number
  std::string getStuNumber();

  // Method to assign a grade to a course
  void assignGrade(std::string co, int gr);

  // Method to return the grade of a course
  int getGrade(std::string co);
private:
  std::string name;                    // name of the student
  std::string number;                  // the student's number
  Course course_grades[MAXNUM];        // courses taken by student
  int no_of_courses;                   // the current number of courses taken
};
#endif
#include "stdafx.h"
#include "Student.h"

// Constructor
Student::Student(std::string nm, std::string no):name(nm), number(no) {
  no_of_courses = 0;
}

// Method to return student's name
std::string Student::getStuName() { return name; }

// Method to return student's number
std::string Student::getStuNumber() { return number; }

// Method to assign a grade to course
void Student::assignGrade(std::string co, int gr) {
  // check whether the maximum number of courses have been taken
  if (no_of_courses == MAXNUM) {
    std::cout << "You have exceeded the maximum number of courses !\n";
    return;
  }
  // create a new course
  Course c(co, gr);
  course_grades[no_of_courses++] = c;
}

// Method to return the grade of a course
int Student::getGrade(std::string co) {
  int i = 0;

  while (i < no_of_courses) {
    //check if course name the same as co
    if (course_grades[i].getCourseName() == co)
      return (course_grades[i].getCourseGrade());
    i++;
  }
  return(-1);
}
Next, create the test class. The following are the test files we wrote for the Student class (called TestStudent.h and TestStudent.cpp):
#ifndef TestStudent_h
#define TestStudent_h
// Note 1
#include <cppunit/extensions/HelperMacros.h>

class StudentTest : public CPPUNIT_NS::TestFixture // Note 2
{
CPPUNIT_TEST_SUITE( StudentTest ); // Note 3
CPPUNIT_TEST( testConstructor );
CPPUNIT_TEST( testAssignAndRetrieveGrades );
CPPUNIT_TEST_SUITE_END();

public:
void setUp();
void tearDown();

// method to test the constructor
void testConstructor();

// method to test the assigning and retrieval of grades
void testAssignAndRetrieveGrades();
};
#endif
#include <cppunit/config/SourcePrefix.h>
#include "stdafx.h"
#include "Student.h"
#include "TestStudent.h"

#include <iostream>
#include <string>


void
StudentTest::setUp()
{
}


void
StudentTest::tearDown()
{
}

// Registers the fixture into the 'registry'
CPPUNIT_TEST_SUITE_REGISTRATION( StudentTest ); // Note 4

// method to test the constructor
void StudentTest::testConstructor() {  // Note 5
// create a student object
Student stu("Tan Meng Chee", "94-1111B-13");

// check that the object is constructed correctly - Note 6
std::string student_name = stu.getStuName();
CPPUNIT_ASSERT(student_name == "Tan Meng Chee");
std::string student_number = stu.getStuNumber();
CPPUNIT_ASSERT(student_number == "94-1111B-13");
}

// method to test the assigning and retrieval of grades
void StudentTest::testAssignAndRetrieveGrades() {
// create a student
Student stu("Jimmy", "946302B");

// assign a few grades to this student
stu.assignGrade("cs2102", 60);
stu.assignGrade("cs2103", 70);
stu.assignGrade("cs3215", 80);

// verify that the assignment is correct - Note 7
CPPUNIT_ASSERT_EQUAL(60, stu.getGrade("cs2102"));
CPPUNIT_ASSERT_EQUAL(70, stu.getGrade("cs2103"));

// attempt to retrieve a course that does not exist
CPPUNIT_ASSERT_EQUAL(-1, stu.getGrade("cs21002"));
}
Next create the main class to kick start the testing process.
#include "stdafx.h"
#include <cppunit/CompilerOutputter.h>
#include <cppunit/extensions/TestFactoryRegistry.h>
#include <cppunit/ui/text/TestRunner.h>

int main(int argc, char* argv[])
{
// Get the top level suite from the registry
CPPUNIT_NS::Test *suite = CPPUNIT_NS::TestFactoryRegistry::getRegistry().makeTest();

CppUnit::TextUi::TestRunner runner;
runner.addTest(suite);
bool wasSucessful = runner.run();
char* c = (char*) malloc(10 * sizeof (char));
scanf (c,"%c");
return wasSucessful ? 0 : 1;
}
Notes for the preceding code:
Modify default project settings, add references to include CppUnit library and header files and include a post-build unit testing command by setting the following from the menu bar:
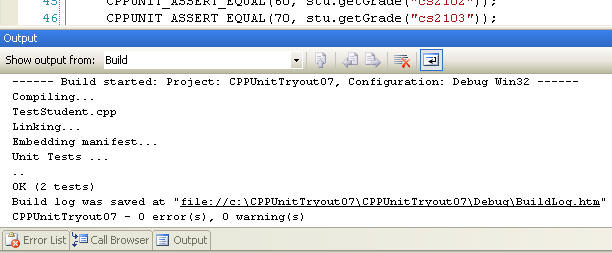
Run unit testing by building the project (press F6). The results of the unit tests will be displayed in the output tab add the bottom of the Visual Studio IDE. Alternatively, simply run the program by pressing F5.

Figure 1. Results of unit tests shown in Output tab
// In Student.h under public
// Method to return the average grade
float findAveGrade();

// In Student.cpp
// Method to return the average grade
float Student::findAveGrade() {
  float sum = 0.0, average;

  // sum up the marks in all the courses
  for (int i = 0; i < no_of_courses; i++)
    sum += course_grades[i].getCourseGrade();
  average = sum / no_of_courses;
  return(average);
}
Now write a method in the TestStudent class to test this newly
created method. Give it a try and see whether you really know how to use
CppUnit