UML Diagrams
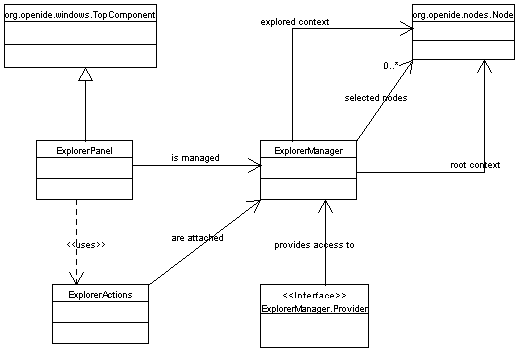
General structure class diagram
Property sheet class diagram
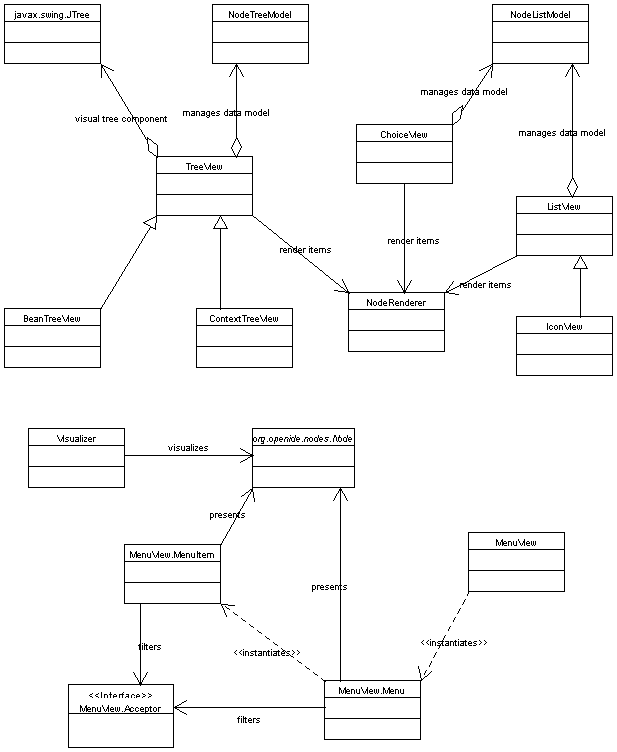
Property views class diagram
org.openide.explorer.
Classes pertaining to the Property Sheet (which displays properties of
explored nodes) may be found in
org.openide.explorer.propertysheet.
A set of standard Explorer Views is available in
org.openide.explorer.view.
A given Explorer instance will be some visual component (such as a Swing panel) displaying some representation of a subtree of the complete Node hierarchy; the topmost node being displayed is said to be the root of the Explorer. Be careful not to confuse the root of a particular Explorer instance, which is selected according to what the user wishes to see, with the root(s) of the entire Node hierarchy, which generally are fixed.
However, the Explorer API is also used for other visual components whose basic structure is derived from the structure of nodes, but for which the treelike view in the normal Explorer is inappropriate. For example, when a new object is to be created from template (by clicking on the toolbar "New"), a dialog window pops up asking the user to select a template. This window is actually a special view that only displays one parent at a time, and displays the children as icons. In fact, the popup menu obtained by right-clicking on a package ("New from Template...") is really an Explorer view too!
The API permits you to use the prebuilt views, and also to create your own if you need to.
TopManager.NodeOperation.explore(...).
This will simply show a node and its subtree (if any) in a new window
using the normal tree-style Explorer view. It does not permit any
customization of the UI, however - it creates a standard window with
the usual buttons, etc.
If you want to use a special view, it is first necessary to understand the structure of a live Explorer instance:
ExplorerManager.Provider.
This topmost container does not really do anything; it just makes sure
that an ExplorerManager can be found by its
children. Most likely you can always just use
ExplorerPanel,
which does nothing in particular except provide the ability to hold
one or more Explorer views, and add whatever displayable components
you like to it (treat it as a frame).
ExplorerManager
itself handles the control of the Explorer view or views it is
attached to. It provides the external interface by which the selection
of nodes, e.g., can be examined or set, and permits multiple views to
be synchronized. ExplorerPanel can create a manager for
you.
ExplorerActions
object will be attached to the manager to make sure that such things
as cut/copy/paste actions are correctly enabled or disabled according
to the current node selection. Typically, the topmost component will
attach these actions to the manager when it is
activated
or otherwise given focus (and detach them when
not). ExplorerPanel does this for you.
ExplorerManager.Provider. This manager should then be
used for all interactions with the views.
ExplorerPanel;
setting its layout if necessary; adding one or more Explorer views in
some configuration; adding other miscellaneous components if needed;
any preconfiguring the manager, for example by giving it a particular
root node to explore, according to the application's needs.
The package
org.openide.explorer.view
contains a number of prebuilt views which you may use. Of special note
are the
BeanTreeView,
which is the standard tree view used to implement the Explorer window
proper;
and
MenuView,
which is of interest because it actually implements a view using popup
menus, rather than a static display. The best way to familiarize
yourself with the standard views, and to test any custom view you
might build, is probably to create an ExplorerPanel which
adds some or all of them; the views will be automatically
synchronized, which will be helpful in understanding how they behave.
PropertySheetView
to the container. It is an Explorer view which does not actually
display any nodes, but rather displays a list of properties for the
node or nodes which are selected according to a manager.
Since views by default will share the same manager if they are added to the same manager-providing container, just adding a regular Explorer view and a property sheet to the same container will result in the property sheet being sensitive to the node selection in the regular view, which is usually the desired effect.
Children.Keys.
Generally nodes may allow their children to be
reordered.
Node.getActions(),
Node.getContextActions(),
Node.getDefaultAction(),
Node.getContextMenu(),
etc. are typically used to build an event-handling system for the
visual representation of the nodes.
Node.hasCustomizer(),
Node.getCookie(...),
Node.getNewTypes(),
Node.getPasteTypes(...),
and so on affect other UI components (such as toolbars) which may hold
action presenters.
Node.getPropertySets()
is of course used by the Property Sheet view.
Node.canRename(),
Node.cloneNode(),
or
Node.clipboardCut().
An Explorer view may be any
visual component;
it need not implement any particular interface, etc. However, the
convention is that it keep track of the Explorer manager that controls
it; this manager should be located when it is
added
to a parent component, by calling
ExplorerManager.find(...),
and then use that manager's properties to control it; the view should
also stop consulting the manager when the component is
removed
from its parent.
The view will want to use a property change listener to keep track of what the manager expects it to do; possibly it could also veto certain changes.
Other than these requirements, nearly any visual representation is possible, and so the API does not specify any more than this.
TreeView
may be used to create a specialized view based on the normal visual
metaphor of an expandable tree of nodes being explored. Many
customizations to it may be done by modifying the
model
it uses to determine which nodes are to be displayed.
Or, one of its implementations may be fine-tuned:
BeanTreeView
provides the usual Explorer view;
ContextTreeView
provides something similar but only displaying non-leaf nodes (which
may be useful as one panel of a multi-paned UI setup, also including a
list view pane).
You may want to customize the property editor behavior in different situations:
// assuming you have this line generated by the ide in the BeanInfo class
properties[PROPERTY_testFile] = new PropertyDescriptor ( "testFile", TestBean.class, "getTestFile", "setTestFile" );
// or alternatively if you return your own array of PropertyDescriptors for
// your bean apply it to the appropriate PropertyDescriptor

// you can add a custom parameter to the PropertyDescriptor
properties[PROPERTY_testFile].setValue("files", Boolean.FALSE);
// (the property editor will not allow selecting files)
    protected Sheet createSheet() {
        Sheet s = Sheet.createDefault();
        try {
            PropertySupport.ReadWrite p = new PropertySupport.ReadWrite (
                    "myDirectory", // NOI18N
                    java.io.File.class,
                    getString ("PROP_directory"),
                    getString ("HINT_directory")
                ) {
                    public Object getValue () {
                        return <get the value from somewhere>
                    }

                    public void setValue (Object o) {
                        <do something with the value>
                    }
                };
            p.setValue("files", Boolean.FALSE); // passing the custom property value here
            s.get (Sheet.PROPERTIES).put(p);
        } catch (Exception ex) {
            TopManager.getDefault().getErrorManager ().notify (ex);
        }
        return s;
    }
        // t is a bean with methods getMyFile() and setMyFile(File)
        DefaultPropertyModel model = new DefaultPropertyModel(t, "myFile");
        model.getFeatureDescriptor().setValue("files", Boolean.FALSE);
        PropertyPanel c = new PropertyPanel(model, PropertyPanel.PREF_CUSTOM_EDITOR);

        getContentPane().add(c); // or whatever with c
firePropertyChange (ExPropertyEditor.PROP_VALUE_VALID, null, Boolean.TRUE);You can fire this change even if you property editor does not implement the ExPropertyEditor interface. The OK button should be enabled/disabled accordingly.
| Property type | Parameter name | Parameter type | Description |
|---|---|---|---|
| java.io.File | directories | Boolean | should directories be selectable as values for the property |
| files | Boolean | should files be selectable as values for the property | |
| filter | javax.swing.filechooser.FileFilter, java.io.FileFilter, java.io.FilenameFilter | the value can be of any of the supported types and represents filter for the file dialog | |
| currentDir | java.io.File | the dir that should be preselected when displaying the dialog | |
| baseDir | java.io.File |
an absolute directory which can be used as a base
against which relative filenames should be interpreted.
Incoming relative paths may be resolved against this
base directory when e.g. opening a file chooser,
as with the two-argument File constructors.
Outgoing paths which can be expressed relative to this
base directory may be relativized, according to the
discretion of the implementation; currently
files selected in the file chooser which are under the
base directory (including the base directory itself)
will be relativized, while others will be left
absolute. The empty abstract pathname
(new File(""))
is used to represent the base directory itself.
|
|
| org.openide.ServiceType | createNew | Boolean | if set to true new instances of the services are created as values, default is false |
| superClass | java.lang.Class | parent class of the service displayed in custom property editor, if not set org.openide.ServiceType is used | |
| noneServiceClass | org.openide.ServiceType | service representing no service | |
| org.openide.loaders.DataObject | currentFolder | org.openide.loaders.DataFolder | selected data object right after displaying the component |
| rootFolder | org.openide.loaders.DataFolder | root folder of displayed tree | |
| rootNode | org.openide.nodes.Node | root Node of displayed tree, when not specified the filesystems repository root node is used instead | |
| cookies | Class[] | allows you to filter DataObjects based on presence of specified cookies. | |
| dataFilter | org.openide.loaders.DataFilter | displays data objects filtered by this filter | |
| folderFilter | org.openide.loaders.DataFilter | should filter displayed folders | |
| nodeAcceptor | org.openide.nodes.NodeAcceptor | filters displayed nodes by supplied acceptor | |
| label | String | label of the tree component | |
| title | String | title of the dialog if used as dialog | |
| inset | Integer | width of border around the tree component | |
| java.lang.Object | superClass | java.lang.Class | Should contain superclass that the value in this property is allowed to be |
| nullValue | Boolean, String | Either Boolean.TRUE or a String, in such case the string represents human readable name of the null value | |
| node | org.openide.nodes.Node | A node to display as root of the custom editor | |
| lookup | org.openide.util.Lookup | A lookup to use to query for results. |
| Affected part | Parameter name | Parameter type | Description |
|---|---|---|---|
| property sheet | canEditAsText | java.lang.Boolean | useful especially when passing value Boolean.FALSE - in this case disable the possibility of editing the the value as text but allows getAsText to return non null |
| custom property editor display | title | java.lang.String | title of the custom property dialog, must be passed to the component itself (e.g. panel.putClientProperty("title", "New custom title.");) |
| property sheet | longerDisplayName | java.lang.String | title for the property sheet, must be passed to the bean descriptor (or node) |
These editors are in a private package outside of the
org.openide hierarchy, so module authors should
not attempt to instantiate or otherwise customize them
directly. It is possible that NetBeans may decide to remove some
such editors if that is necessary for some reason; if this happens,
existing module code should not break (as there are no direct
references to the deleted classes), but rather properties of that
type will cease to be conveniently editable by the user (system
options will still be restored from disk correctly, however). If
this happens, the module author will need to provide an appropriate
editor for the module to be fully functional again. For properties
which are critical to a module's operation and must be edited for
basic functionality to work, module authors will likely want to
provide their own editors to begin with.
A few of these editors are for classes in the Open API packages; in such cases, the documentation for the class in question will mention that there is a property editor available. Also, the following Java platform classes currently have special NetBeans property editors which may be used via the default search path:
java.awt.Color
java.awt.Dimension
java.awt.Font
java.awt.Insets
java.awt.Point
java.awt.Rectangle
java.lang.Class
java.lang.String
java.util.Properties
javax.swing.ListModel
javax.swing.table.TableModel
A number of other editors and property editor extensions are
available in the package
org.openide.explorer.propertysheet.editors,
but these are likely to be deprecated soon; modules are encouraged to
instead rely solely on the default editor search path, and to add needed configuration
parameters
to their
Node.Propertys
or
PropertyDescriptors
so as to be accessible from
PropertyEnv
as used by
smart
property editors.