Release 2.2
Part Number A85248-01
Library |
Product |
Contents |
Index |
| Oracle Enterprise Manager Administrator's Guide Release 2.2 Part Number A85248-01 |
|
![]()
![]()
This chapter introduces the Oracle Enterprise Manager Console and provides an overview of its components. The following topics are included in this chapter:
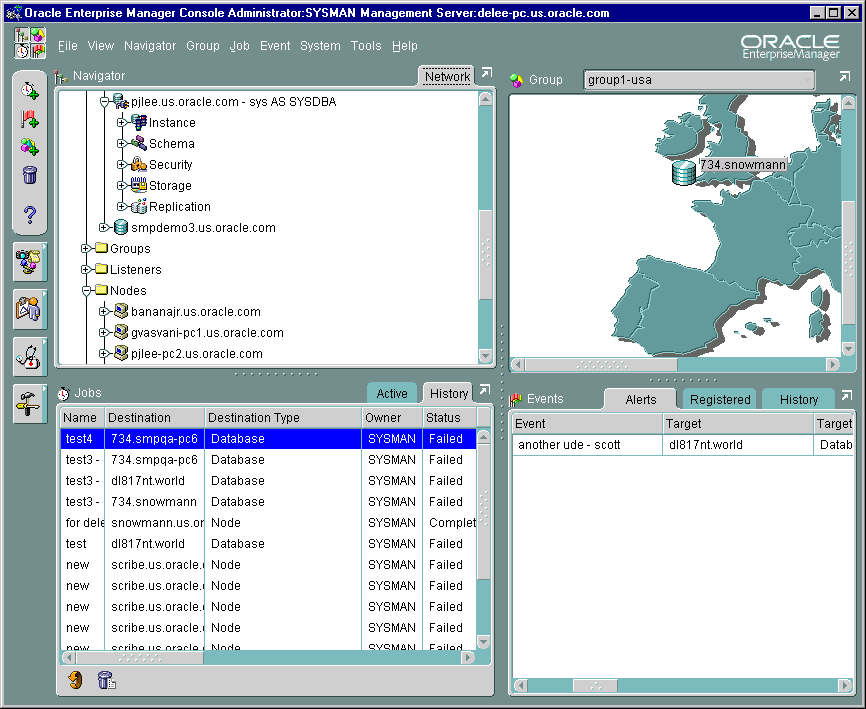
The Console is the primary interface used for all Oracle Enterprise Manager operations. It provides menus, toolbars, and the framework to access Oracle tools and utilities available through other vendors. The graphical configuration of the Console and the tools available are determined by the optional products installed and user preferences. See Figure 1-1, "Console Window" for an illustration of a Console screen.
The Console includes viewing panes for the Navigator, Group, Jobs, and Events systems.
The Navigator displays a hierarchical list of all the services in a network, providing a direct view of services such as databases, groups, listeners, and nodes, plus the objects that they contain. The Navigator shows all the network services with their relationships to other objects.
Through the Navigator, you can also launch administration tools for managing objects such as database users and tablespaces. You can also perform many administration tasks in the Navigator, such as creating, editing, or dropping tablespaces. See Chapter 2, "Navigator" for information.
The Group system allows you to organize managed services into logical groups that you can then manage collectively with a graphical display. With the Group system, you can create, save, modify, and view groups. To create a group of services, drag and drop objects from the Navigator into the Group view. See Chapter 3, "Groups" for information.
Jobs are standard tasks, such as executing a SQL script or backing up a database, that can be automated through Oracle Enterprise Manager. The Job system allows you to manage and schedule jobs and remote operations for the services of your network. Jobs can be scheduled at various times, such as daily or weekly, and at single or multiple destinations. See Chapter 4, "Jobs" for more information.
The Event system allows you to monitor and display the status of events--such as a loss of service--occurring on the managed services in your network system. See Chapter 5, "Events" for more information.
The Console menu bar provides access to the following menus:

Text description of the illustration menu.gif
The File, View, System, Tools, and Help menus are described in this section.
When using the Console menus, note that:
You can click the right mouse button on objects in some windows of the Console to display a context-sensitive, or short-cut, menu. This menu usually contains a subset of the options that are available through a menu in the main menu bar. For example, if you click the right mouse button on a group in the Navigator pane, a menu appears with the menu options from the Group menu.
|
Note: See "Discovering Services" on page 2-7 for information on context-sensitive menu options in the Navigator. |
The File menu items allow you to exit the system.
The View menu customizes the Console layout, allowing you to show or hide toolbars or windows. You can also use the window palette located in the upper-left corner of the Console to access the View menu options. At least one window must be visible in the Console.
Hides or shows the Navigator pane.
Hides or shows the Job Scheduling pane.
Hides or shows the Event Management pane.
Hides or shows the Group pane.
Hides or shows the Oracle Enterprise Manager toolbar.
The System menu provides options to set up administrator and system configurations.
Displays the Edit Administrator Preferences property sheet, which allows the current administrator to change preferences, including permissions and login credentials. See "Administrator Preferences" on page 1-11 for more information.
Displays the Administrator Manager Accounts property sheet for adding, modifying, and removing administrators. This option is only available to Super Administrators. See "Managing Enterprise Manager Administrators" on page 1-8 for more information.
The System menu contains the Configure SMTP Gateway option. Use the Configure SMTP Gateway option to specify the SMTP gateway that is used for the SMTP E-mail system. E-mail notification will not function correctly until the SMTP gateway is set properly. This menu option is only available to super administrators.
Updates the local network configuration file (tnsnames.ora) with discovered services information. You should run this after a Discovery operation so that any Value-Added Applications, such as Oracle Parallel Server Manager or Replication Manager, can access the discovered services.
Changes the font settings for the Console and DBA Studio.
Font settings in pop-up menus will not change even if you have specified to change the font settings.
Allows you to create an HTML-based Enterprise Report containing information such as event alerts, scheduled jobs, groups, and discovered services for all managed nodes in your enterprise. For more information, see "Creating Enterprise Manager Reports" on page 1-35.
The Tools menu allows you to execute database applications and other utilities that have been installed on your system. The menu options in the Tools menu depend on your installed Oracle Enterprise Manager configuration.
This menu option lists the database administration functions that you can execute from the Console. Examples include schema, instance, and security management.
This menu option lists integrated applications such as the Oracle Application Server Manager.
Other optional applications may also be available from this menu.
From the Help menu, you can access the Enterprise Manager online help system. You can also access Enterprise Manager's Quick Tours. Enterprise Manager comes with a variety of Quick Tours, each providing a comprehensive overview for Enterprise Manager and specific integrated applications. Enterprise Manager version information is also available.
Enterprise Manager, Release 2.2 is a multi-administrator system: every person who is administering systems using Enterprise Manager has his or her own administrator account which he or she uses to log into the Console or stand-alone application.
The installation of Enterprise Manager creates a single super administrator named sysman. The super administrator sysman creates administrators using the Manage Administrators item in the System menu. In addition to an administrator name and password, each account can be tagged as a "Super Administrator" account or an account to which the administrator has access to only jobs and/or events. Differences between the two types of accounts are as follows:
sysman account for daily administration work is not recommended. The Super Administrator account is similar to root on UNIX or Administrator on Windows NT and is a user which cannot be deleted or renamed. It is a user that can perform any task and therefore should be used only for setting up the environment. After the necessary DBA accounts are created, the Super Administrator account ' SYSMAN' should not be used anymore.
Typically, all administrators share a single Enterprise Manager, Release 2.2 repository, which allows administrators to share information. Although you can set up multiple repositories, administrators using different repositories will not have access to each other's information; there is no sharing of data between repositories. Administrative data stored in the repository is filtered based on administrator permissions.
Preferred Credentials must be set up for each administrator account. When an administrator connects through the Navigator or stand-alone application, the preferred credentials used are those defined explicitly for that administrator.
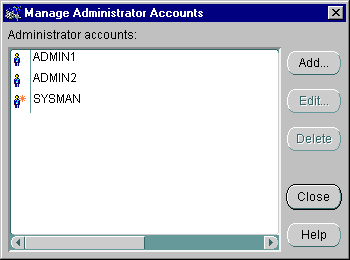
Enterprise Manager administrators are created, edited, and deleted with the Manage Administrators option of the Console System menu. The Manage Administrators option displays the Manage Administrator Accounts dialog (Figure 1-3, "Manage Administrator Accounts"). The Manage Administrators option is only available to Super Administrators. Super Administrators have full privileges for all objects and can create, edit, and delete other administrators. The Super Administrator sets up the administrator name and initial password and determines whether an administrator is a Super Administrator or regular administrator. The Super Administrator also determines whether the administrator has access to the job and event systems.
In this dialog, you can:
In the Manage Administrators dialog, enter a unique administrator name and password for the Enterprise Manager administrator. Note that the administrator name is not the same as a database username.
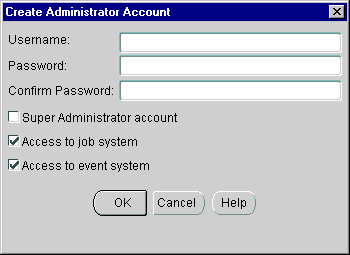
Check the access available to the administrator:
Allows the administrator to add other administrators, as well as access to all created objects, e.g., jobs, events, and groups.
Allows the administrator access to the Job system, but does not automatically give access privileges for specific jobs.
Allows the administrator access to the Event system.
After an administrator has been created, the administrator can log in to the Enterprise Manager Console and set up administrator preferences.
If you select the Edit button, you will get the Preferences window, as described in "Administrator Preferences" on page 1-11. You can then edit the preferences for the selected administrator.
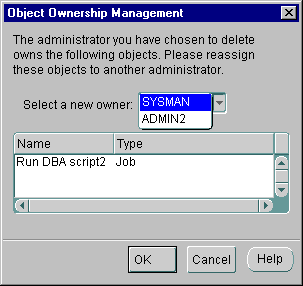
If you delete an administrator who owns any object, the Object Ownership Management dialog appears. See Figure 1-5, "Object Ownership Management". The dialog allows you to reassign the objects to another Enterprise Manager administrator. If you do not reassign the objects, the objects are deleted.
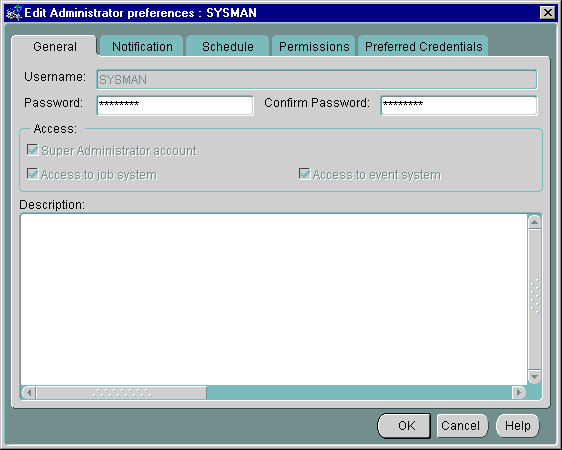
The Edit Administrator Preferences property sheet is displayed with the Preferences option of the System menu. This property sheet allows you to configure the preferences for an Enterprise Manager administrator. The pages in the property sheet are:
The General Preferences page allows a Super Administrator to change an administrator's password and access privileges.
The Notification page allows you to set up paging and email notification methods for the administrator. This page consists of a hierarchical tree list and a right-side modal area that changes according to the object selected in the navigator. The tree list consists of four top-level objects:

Notification filters allow each administrator to specify when to send an email notification as opposed to a page notification as a result of a job or event status change.
The Job Notification Filter allows you to filter email/pages sent to an administrator according to job status. As with the Event Notification Filter, filtering is set at the user level by checking or unchecking the desired option. Selecting all job statuses provides no filtering.
This page allows you to specify notification parameters for email.
This page allows you to select the content and format of the email subject line. By default, Type, Name, and Status are selected. You use the left/right arrows to move items back and forth between the Available and Selected lists.
Once an item has been selected, you can control the order in which the item appears by selecting it in the list and using the up/down arrows (located to the immediate right of the Selected list) to reposition the item within the list.
|
Note: The following information also applies to inserting content into the Email/Paging message body. |
Service Type
Status
Timestamp Format
This option is available if Timestamp is chosen from the Selected list. You use the pull-down menu to select one of the pre-defined formats.
Do not include titles
When selected, classification titles such as Status, Service Name, and Timestamp are omitted from the message.
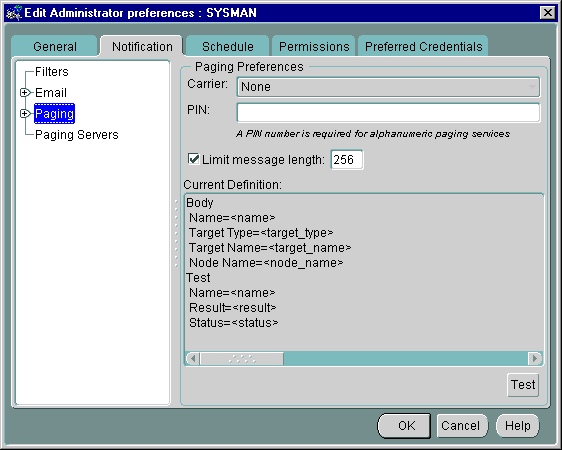
This page allows you to specify notification parameters for paging.
Click on the Send button to send a test page to the specified pager. A message informs you of the status of the test page.
If the test fails, check the log file. If tracing is enabled for paging, you can also view the paging trace log file in the ORACLE_HOME\sysman\log directory on the machine which has the paging server.
Numeric pages need to be interpreted as follows:
For job notifications, you will receive a 3 digit number which indicates the job status.
For event notifications you will receive the status code.
The event status and job status codes are listed as follows:
100 = Job Started
200 = Job Completed
300 = Job Failed
400 = Job Deleted
500 = Event Cleared
600 = Event Warning
700 = Event Alert
800 = Event Node Down
900 = Event Unknown
1000 = Event Assignee Changed
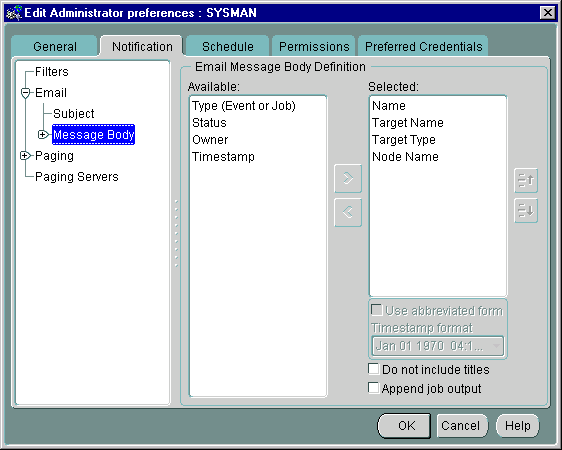
This page allows you to select the content and format for the body of the email or page message. By default, Name, and Status are selected. You use the left/right arrows to move items back and forth between the Available and Selected lists.
Expanding the Message Body object in the navigator and selecting per Test allows you to use a subset of the following option settings on a per test basis. See "Email Subject" on page 1-16 for more information on manipulating message content.
Service Type
Status
Timestamp Format
This option is available if Timestamp is chosen from the Selected list. You use the pull-down menu to select one of the pre-defined formats.
Do not include titles
When selected, classification titles such as Status, Service Name, and Timestamp are omitted from the message.
Append job output
When selected job output is appended to the end of the notification. For instances where job output is large, you may want to specify a limit to the message length. If the job output pushes the notification length past the specified limit, then the job output will be truncated, not the message itself.
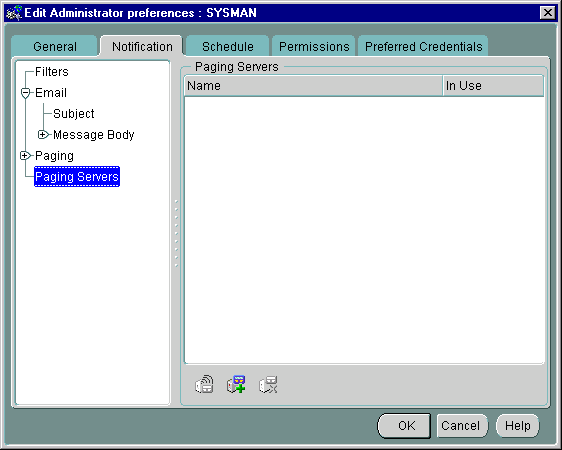
This page lists all available paging servers currently recognized by Enterprise Manager.
The multi-column list consists of two columns: The name of the paging server and whether the paging server is currently being used. Below the list are three icons that allow you to perform the following operations:
Except for the Add Paging Server icon, the icons are grayed out unless a specific paging server is selected from the list. For information on how to add a paging server, see "Setting Up Paging" on page 1-29 and "Adding a Paging Server" on page 1-30.
Use this property sheet page to indicate when you want to be paged and/or e-mailed. Determine the day, hour, and the method of notification. You will receive notifications only on the objects you have permission to access.
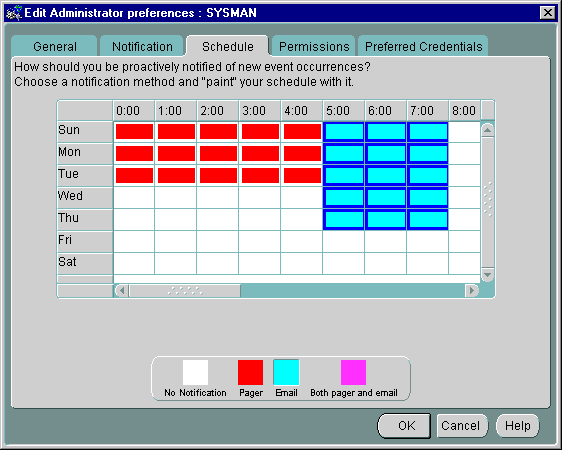
An administrator can be notified by email, paging, or both email and paging. Paging is recommended for urgent jobs, events, or critical systems.
To determine notifications:
If you want to set the same notification an entire day or an hour of the day, click on the heading for that row or column. For example, if you want to set up paging notification for Saturday, click on the Sat heading after you have selected Pager at the bottom of the screen. You can also drag the cursor to "paint" across multiple cells.
Use this property sheet page to determine the default permissions you want to assign to other administrators for the objects you create. This allows other Enterprise Manager administrators to share objects, such as events and jobs, that you have created. If you work on a team, this page lets you assign access privileges to all the members of the team at one time. When an object is created by an administrator, that administrator is the owner and automatically has full permissions. The owner's permissions cannot be modified.
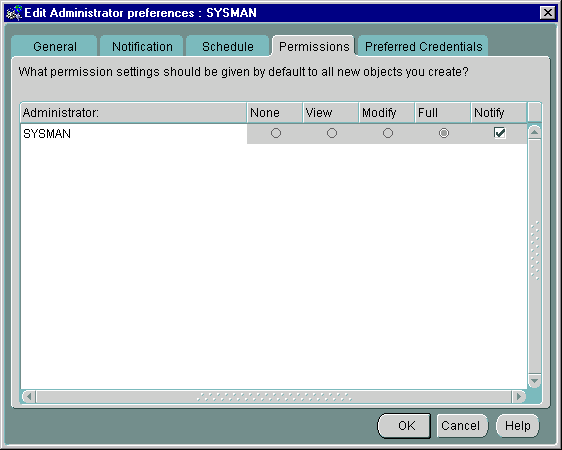
Access-control permissions apply to event, group, and job objects. When these objects are created, the default permissions are assigned to other Enterprise Manager administrators according to the selections in this page. These initial permissions can be overridden with the Permissions page of the object's property sheet.
For more information, see the following sections:
|
Note: Changing your default permissions does not retroactively change permissions on existing objects. |
The levels of permission that you can assign to an Enterprise Manager administrator are:
This permission does not allow the administrator to view this object anywhere.
This permission allows the administrator to view the object, inspect object properties, view job/event status and outputs, and receive notifications if the object is an event.
This permission allows the administrator to edit the object's properties except those reserved for Full permission.
This permission allows the administrator to delete the object, modify permissions for other administrators, and change the ownership of the object.
This permission allows the administrator to receive enhanced notifications on the objects. Notify permission cannot be assigned if the administrator's permission level is set to None.
The Administrator Preferred Credentials property sheet page displays a list of services in the network, along with the service type and the administrator name for accessing the service. The property sheet page is accessed with the Administrator Preferences option of the System menu. Each row in the list of the property sheet includes:
You can click on a column heading to sort on that column. See Figure 1-14, "Administrator Preferred Credentials"for an illustration of the property sheet.
|
Note: Individual instances of an Oracle Parallel Server are listed. Oracle recommends that all instances of a Parallel server use the same preferred credentials as the Oracle Parallel Server. |
Also, the Intelligent Agent authenticates the user name and password for all jobs and many events that it runs. These credentials are used when you access a network service in the Navigator or Group, and when running jobs and registering events. If you do not set the preferred credentials correctly, jobs and events may fail. See "Job Credentials" on page 4-4 and "Registering Events" on page 5-6 for more information.
Oracle recommends that if some services of a particular type require the same credentials, use the <DEFAULT> credentials selection for that service type to have those credentials used by all services of that type.
For example, if Administrator_1 has a username and password of foo/bar on all the databases that he manages, the administrator needs to enter foo/bar as his credentials in the <DEFAULT> database entry. All database administration tasks will use these <DEFAULT> credentials.
Furthermore, if the administrator has just one database which requires different credentials from foo/bar, he can enter different credentials for that database by selecting that specific database.
For NT users, you must set the preferred credentials for the node (where the NT Intelligent Agent resides) to be the same as the user that is set up to "Logon as a batch job."
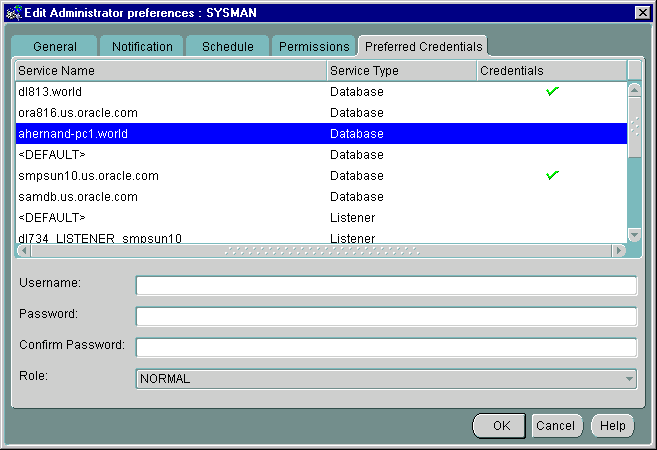
Select any row to update the credential fields for the object identified in the row.
Enter the username. This field is required if a password needs to be entered.
Enter the password associated with the username.
Confirm the password.
Select the role from the pull-down list. You need to login with the SYSDBA or SYSOPER role to start up or shut down a database.
Changes to the credentials are recorded when you move to another line. When you are finished, save all your updates by clicking the OK button at the bottom of the property sheet.
Another convenient way to specify Preferred Credentials for discovered services is to select the Save as Preferred Credential option when manually connecting to a service from the Console or integrated application. For example, you attempt to access a newly discovered database from the Console Navigator. Enterprise Manager displays the Connect Information dialog so that you can log in to the database. You type in the requisite information and check the Save as Preferred Credential option. Click OK to log on to the database and save the logon information as a Preferred Credential for this service.
Save list allows you to extract information from a multi-column list (such as the Job or Event History panes) and save it in a variety of formats (text, HTML, or Comma-Separated-Values). For example, you can select one or more entries in the Event History pane. By selecting the Report Event History from the Events Menu, you can save the list information (Event, Target, Target Type, Severity, Date/Time, Assigned To, Owner) to an HTML file. The dialog consists of the following elements:
The name and directory to which you want to save the file information.
Displays the File Save to dialog. Choose the desire location and file name.
Select HTML (table), Text row, or comma-separated-values (used by spreadsheets or other applications).
Active only when HTML is selected as the file format, allows you to view the generated HTML table through the default browser for your system.
If you want to be notified via paging in Oracle Enterprise Manager, you must explicitly install the Oracle Enterprise Manager Paging Server. This paging service is not installed as part of the base Oracle Enterprise Manager installation; it is installed through a Custom installation type. Refer to the installation guide provided with the database release for more details.
|
Note: The Paging Server is only available on Windows NT or Windows 2000, but the ability to configure it is available on both Unix and Windows platforms. |
Only one paging service installation is required if you wish to utilize paging for notification purposes within Oracle Enterprise Manager.
The paging service supports either numeric or alphanumeric pagers and utilizes the following paging service protocols (for alphanumeric pagers only).
To use alphanumeric paging, you need a phone number to call for the modem at the paging service provider and the pin number for your pager. Contact your paging service provider for the phone number to call. It is the number for the modem for sending pages.
Your paging provider may also have a feature for sending email to your pager. If you have that feature, you can configure an administrator's preferences for notification to use email, and specify your pager as the email receiver. This method will also work with many providers for sending notification to a cell phone.
Configuration of the paging service is not automatic. Follow the steps below to configure paging.
On the machine from which you want to run the paging service, follow these instructions:
|
Note: You must have a modem installed on the Windows NT or Windows 2000 machine that you are running the paging service. |
You can also start the paging service by typing the following at a command prompt
oemctrl start paging
|
Note: Only Super Administrators can add a paging server; this functionality is not available to regular administrators. |
If the Console is unable to find the paging server with the given hostname, an error appears, saying "VD-4362: Could not add paging server, as paging server <hostname> could not be reached."
If the paging server is found, a new paging server object is added under the "Paging Server" object in the tree list. The new paging server will have no paging carrier. You must add at least one paging carrier in order for paging to function.
|
Note: Only Super Administrators can add a new paging carrier; the functionality is not available to regular administrators. |
Paging carrier name. Field accepts alphanumeric characters and underscores.
Type of paging carrier. Enterprise Manager supports alphanumeric or numeric.
TAP, FLEXTD, or GSM. Protocol selection is only available if the carrier type is Alphanumeric.
While the Super Administrator configured the paging server and its carrier(s), all administrators who want page notifications must specify their own notification preferences by following the steps below:
Refer to the Oracle Enterprise Manager Administrator's Guide for instructions on how to set up the notification schedule.
|
Note: Only Super Administrators can remove a paging server; the functionality is not available to regular administrators. |
A warning dialog appears, saying "Remove Paging Server <servername>?"
|
Note: Only Super Administrators can view information on a paging server; the functionality is not available to regular administrators. |
From the Notification page, left-click the paging server object.
The detail view to the right will show information about that paging server such as the paging carrier names, the pager types, the protocol, and whether or not they are in use.
|
Note: Only Super Administrators can ping a paging server; the functionality is not available to regular administrators. |
To check the status of the paging server, follow the steps below:
To check the paging status, right-mouse click the carrier name to access the Ping Paging Service item in the context-sensitive menu.
Stop the paging service from the Windows NT or Windows 2000 Services Control Panel.
You can also stop paging service by typing
oemctrl stop paging
|
Note: Only Super Administrators can remove a paging carrier; the functionality is not available to regular administrators. |
A message appears, saying "Remove Paging carrier <carrier name>?"
|
Note: Only Super Administrators can edit a paging carrier; the functionality is not available to regular administrators. |
The Console will validate all the carrier information, update the notification tree. All administrators who have selected to use this carrier will automatically inherit the new changes.
If the validation fails, an error dialog appears stating which entry failed to validate and what type of input is expected. When you click the "OK" button in the error dialog, all the paging carrier's entries are set back to their original values.
From the Notification page, select the paging carrier object. The paging carrier information appears in the detail view to the right.
The Report Wizard allows you to generate pre-defined reports for all managed targets. The Enterprise Manager Job system is used to schedule and execute the task of generating the actual report. For this reason, the prerequisites for successful Job system operation apply to correct functioning of the Report Wizard: node preferred credentials must be set, network communication between the Management Server and the agent/managed target, the Management Server must be operational.
Oracle Enterprise Manager allows you to generate two types of reports: Enterprise Reports and Database Configuration/Status Reports.
The Enterprise Report provides an overview of the information contained within the Enterprise Manager repository.
This report covers the includes the following information:
Including the administrators, the discovered agent, the job and event library, and the available Data Gatherer collections.
This topology overview provides details on the state of all services known in the repository such as outstanding alerts, job information and basic configuration of the service.
An Enterprise Report cannot be customized.
A Database Configuration/Status Report may contain schema, instance, storage, and security information, depending on what options you select in the Generate Report dialog. This report can either be generated immediately, locally on the client machine, or it can be scheduled as a job.
If you schedule a Database Configuration/Status Report, information from the Enterprise Report is included in a single report. If an Enterprise Report has been previously generated, and you then create a Database Configuration Report, database configuration information is added to the existing Enterprise Report.
The following general requirement must be met to generate a report:
The Report Wizard can be launched in two ways, each generating a different type of report.
|
Note: Although the Report Wizard is available to all administrators, the Report Wizard's Schedule button is enabled for super administrators only |
To create an Enterprise Report, perform the following steps:
During the creation of the job, the wizard will ask for two parameters:
To minimize network traffic and make the setup easy and convenient, use the Intelligent Agent on the machine with the web server to generate the report. The generated HTML files will therefore be usable by the web server immediately.
The reports are first generated in the $TEMP directory. To avoid partial updates and partially refreshed information, either copy the entire set of HTML files from the TEMP directory to their final destination after successful completion or remove all files if the job cannot complete successfully.
From DBA studio reports, specific database reports can be scheduled as a job. This job follows the same conventions and has the same requirements as the system reports.
If there is no job currently scheduled for the system reports, the DBA Studio reports will generate this job and schedule it, together with the job to generate the database report.
If DBA Studio finds the job for the system reports, it will use the settings of this job (the Intelligent Agent to be used to generate the report, and the output directory) for its job definition.
The database reports can be scheduled in two ways.
|
|
 Copyright © 1996-2000, Oracle Corporation. All Rights Reserved. |
|