Release 2 (8.1.6)
Part Number A76959-01
Library |
Product |
Contents |
Index |
| Oracle8i Replication Release 2 (8.1.6) Part Number A76959-01 |
|
Oracle Replication Manager provides a graphical user interface (GUI) for setting up, managing, and monitoring a replication environment. Replication Manager includes wizards that guide you through many important operations. You can use Replication Manager to manage both multimaster and snapshot replication environments. Replication Manager is integrated with Oracle Enterprise Manager.
This chapter introduces you to the features of Replication Manager. However, the primary documentation for using Replication Manager is the Replication Manager online help. This chapter covers the following topics:
Using Replication Manager, you can:
You can start Replication Manager using the Oracle Enterprise Manager Console or as an independent application.
On the Oracle Enterprise Manager Console, choose:
Tools > Extended Database Applications > Oracle Replication Manager
The way you start Replication Manager as an independent application depends on your operating system.
On Windows platforms, use the Start menu to choose:
Programs > Oracle - OEM_LABEL > Extended Database Administration > Replication Manager
where OEM_LABEL is the label specified for Oracle Enterprise Manager during installation.
On UNIX systems, enter the following at a command prompt:
oemapp repmgr
The first time you log in to Replication Manager, it should be as SYSTEM or SYS user. After you log in as SYSTEM or SYS user, use the Setup Wizard to set up your master definition site and, if you want a multimaster replication environment, your other master sites.
When setup is complete, log in to Replication Manager as the replication administrator you specified in the Setup Wizard. If you follow convention, the username of the Replication Administrator is REPADMIN. You should only log in to Replication Manager as the replication administrator, not as any other user, after setup is complete.
The Replication Manager interface includes two panes, a toolbar, and various menu items.
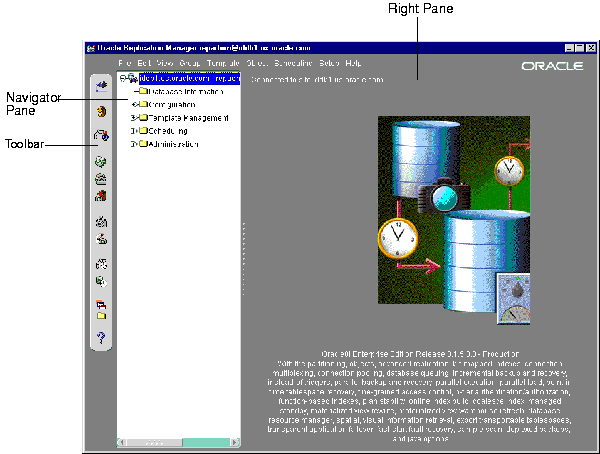
The Replication Manager interface has two panes: the Navigator pane and the right pane.
The Navigator pane in Replication Manager functions the same way as it does in other Oracle Enterprise Manager applications. That is, the Navigator pane lets you:
In Replication Manager, the Navigator pane has the following major containers:
The right pane of replication manager contains both information that enables you to monitor your replication environment and property sheets that enable you to manage your replication environment. Figure 8-2 shows an example of a property sheet.
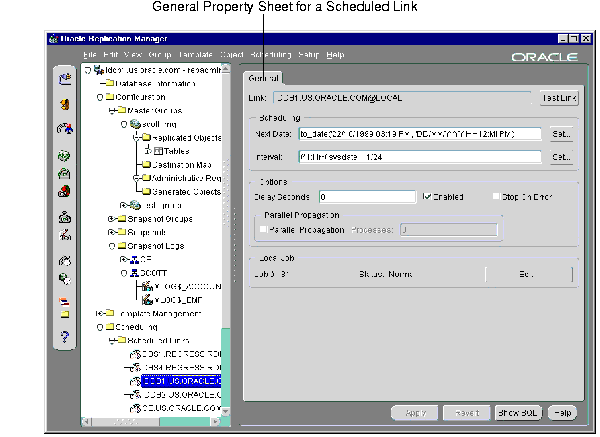
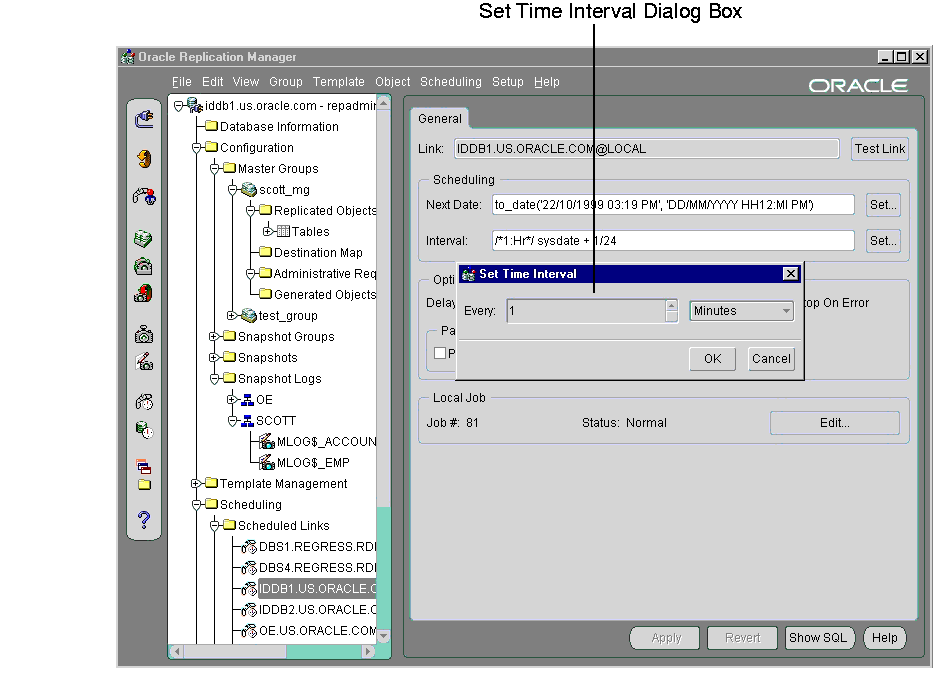
When you are working with a property sheet, you may click on a button that opens a new dialog box. For example, if you click the Set button associated with the Interval field, the Set Time Interval dialog box appears, as shown in Figure 8-3.
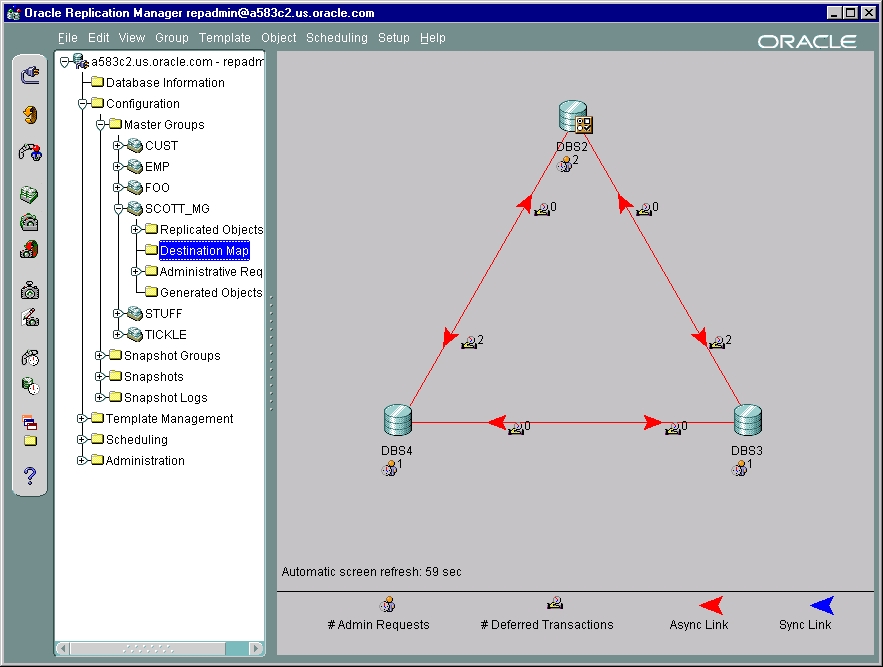
You can also use the right pane of Replication Manager to monitor your replication environment. The Destination Map is an example of a monitoring tool that is available to you. The Destination Map shows the following information:
For example, the Destination Map in Figure 8-4 shows the following:
In addition, you can right-click the Destination Map to open a menu that lets you perform actions such as refreshing the Destination Map and editing the master group shown.
The Replication Manager toolbar lets you quickly perform the most common operations in a replication environment. The toolbar buttons are:
Opens the Database Connect Information dialog box, which lets you connect to a different database.
Refreshes the Replication Manager interface so that you see the latest information. The Replication Manager interface does not refresh automatically, so refreshing manually may be important for monitoring various aspects of your replication environment, such as deferred transaction queues.
Opens the Replication Manager Setup Wizard, which guides you through the process of setting up master sites and snapshot sites. When you run the Replication Manager Setup Wizard, make sure you are connected as SYS or SYSTEM user.
Opens the Create Master Group dialog box, which lets you create a new master group. When you create a master group, the site to which you are connected becomes the master definition site for the master group.
Opens the Snapshot Group Wizard, which guides you through the process of setting up a snapshot group. When you create a snapshot group, make sure you are connected to the snapshot site that will contain the snapshots included in the snapshot group.
Opens the Create Refresh Group dialog box, which lets you create a new refresh group. When you create a refresh group, make sure you are connected to the snapshot site that contains the snapshots that will be included in the refresh group.
Opens the Create Snapshot dialog box, which lets you create a new snapshot. When you create a snapshot, make sure you are connected to the snapshot site where you want to create the snapshot.
Opens the Create Snapshot Log dialog box, which lets you create a new snapshot log for a master table. When you create a snapshot log, make sure you are connected to the master site that contains the master table for which you want to create a snapshot log.
Opens the Create Scheduled Link dialog box, which lets you create a new scheduled link.
Opens the Create Local Job dialog box, which lets you create a new local job.
Opens the Deployment Template Wizard, which guides you through the process of creating a new deployment template. When you create a deployment template, make sure you are connected to a master site that contains the objects that will be included in the deployment template.
Opens the Offline Instantiation Wizard, which guides you through the process of packaging the deployment template and generating offline instantiation files. You can generate offline instantiation files for Oracle8i Lite and for Oracle server (which includes Oracle8i Enterprise Edition, Oracle8i Standard Edition, and Oracle8i Personal Edition). When you generate offline instantiation files, make sure you are connected to the master site that contains the deployment template.
|
Note: To generate online instantiation files, you must use the replication management API. See Oracle8i Replication Management API Reference for information about generating online instantiation files. |
The Help button opens the Replication Manager online help.
You use Replication Manager's menus to perform actions, such as refreshing the Replication Manager interface, and to open wizards and dialog boxes. The following list describes the items available under each menu.
The items in the File menu depend on whether you connect to Replication Manager using the Oracle Enterprise Manager Console or independently.
The File menu has the following menu items if you connected to Replication Manager using the Oracle Enterprise Manager Console:
|
Disconnect |
Lets you disconnect from the selected database in the Navigator pane. |
|
Exit |
Lets you exit Replication Manager. |
The File menu has the following menu items if you connected to Replication Manager independently:
|
Exit |
Lets you exit Replication Manager. |
The Edit menu has the following menu item:
The View menu has the following menu item:
|
Refresh |
Lets you refresh the Replication Manager interface. It performs the same action as the Refresh button on the toolbar. |
The Group menu has the following submenus and menu items:
The Template menu has the following menu items and submenus:
The Object menu has the following menu items:
The Scheduling menu has the following menu items and submenus:
The Setup menu has the following menu items:
The Help menu has the following menu items:
|
Contents |
Opens Replication Manager online help. |
|
About Replication Manager |
Opens a window that displays the Replication Manager version number and copyright information. |
The Replication Manager wizards provide step-by-step guidance for tasks that require many steps. The wizards simplify complex tasks by guiding you through the task in manageable steps. The following sections describe the Replication Manager wizards:
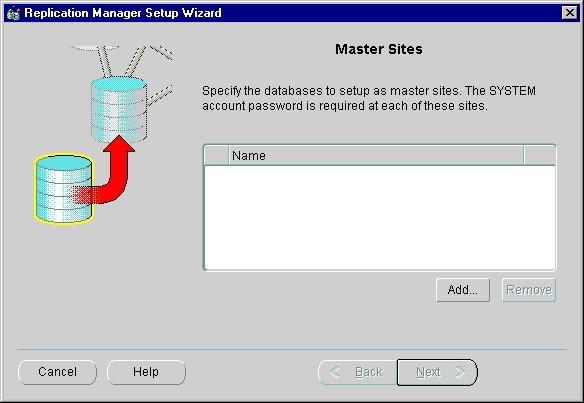
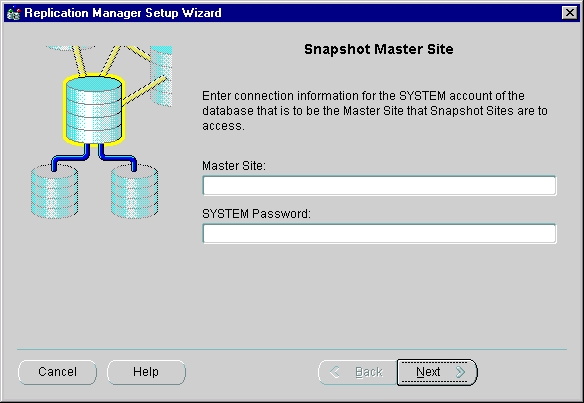
The Setup Wizard guides you through setting up master sites and snapshot sites for replication. Preparing sites for replication is a simple process using the Setup Wizard. At each site that you specify, the Setup Wizard performs the following steps:
The Setup Wizard is slightly different for master sites than for snapshot sites. To open the Setup Wizard to set up master sites, choose Setup > Master Sites from the menu bar.
To open the Setup Wizard to set up snapshot sites, choose Setup > Snapshot Sites from the menu bar.
|
See Also:
Chapter 2, "Master Concepts & Architecture" for more information about master sites, and see Chapter 3, "Snapshot Concepts & Architecture" for more information about snapshot sites. |
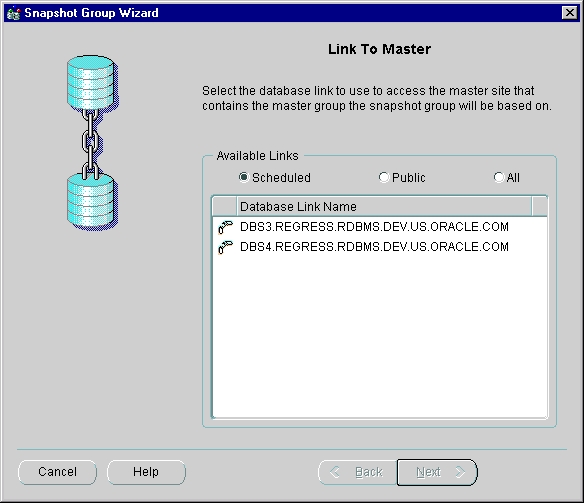
The Snapshot Group Wizard guides you through creating a group of snapshots based on a master group. Each snapshot can be a partial or complete copy of the master table from its source master group. Snapshot groups are located at remote snapshot sites and are based on a single, target master group at a master site.
Run the Snapshot Group Wizard at the snapshot site where you want to create the snapshot group. To open the Snapshot Group Wizard, click the Create Snapshot Group button on the Replication Manager toolbar.
Deployment templates simplify the task of deploying and maintaining many remote snapshot sites. Using deployment templates, you can define a collection of snapshot definitions at a master site and use parameters in these definitions to customize the snapshots for individual users or types of users.
For example, you might create one template for the sales force and another template for field service representatives. In this case, a parameter value might be the sales territory or the customer support level. When a user instantiates a template, the appropriate snapshots are created and populated at the remote site.
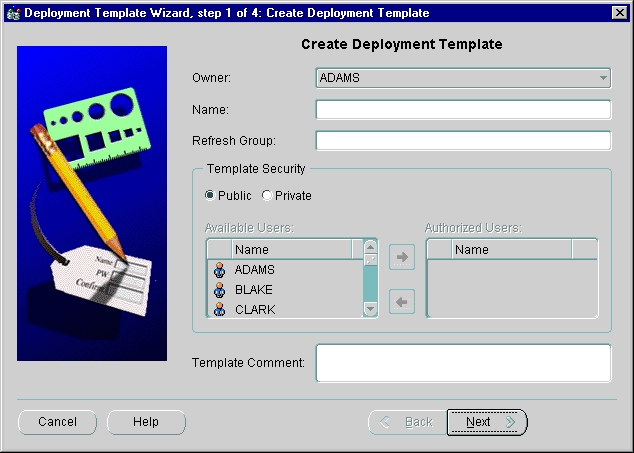
The Deployment Template Wizard guides you through creating a deployment template. Separate screens in the Deployment Template Wizard let you:
Run the Deployment Template Wizard from the master site where you want to create the deployment template. To open the deployment template wizard, click the Create Template button in the Replication Manager toolbar.
|
See Also:
Chapter 4, "Deployment Templates Concepts & Architecture" for more information about deployment templates. |
Offline instantiation allows end users to use a generated file to instantiate a template without being connected to the master site through a network. Offline instantiation allows you to write all of the necessary DDL and data to a file that you then transfer and run at your snapshot site. This solution is best suited for laptop users with low-speed WAN connections, or other cases where connectivity is unstable or slow.
This solution is best suited for laptop users with low-speed WAN connections, which could make online instantiation difficult.
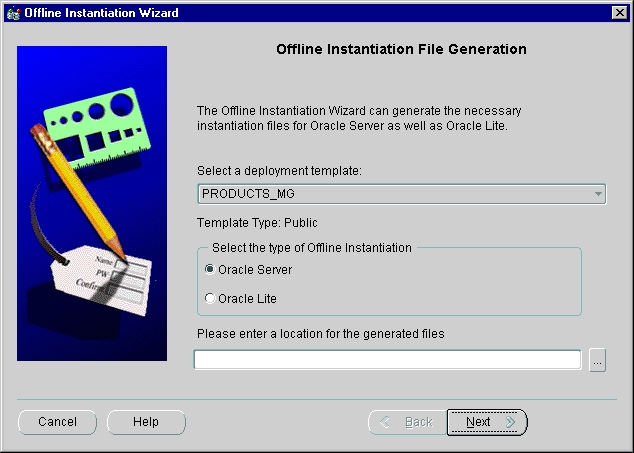
The Offline Instantiation Wizard guides you through packaging a deployment template for offline instantiation. The Offline Instantiation Wizard generates offline instantiation files that you use to build snapshots and other objects at your snapshot sites.
Run the Offline Instantiation Wizard at the master site that contains the template for which you want to generate the offline instantiation files. To run the Offline Instantiation Wizard, click the Offline Instantiation File Generation button in the Replication Manager toolbar.
|
Note: To generate online instantiation files, you must use the replication management API. See Oracle8i Replication Management API Reference for information about generating online instantiation files. |
|
See Also:
"Packaging and Instantiation Process" for more information on packaging and instantiating deployment templates. |
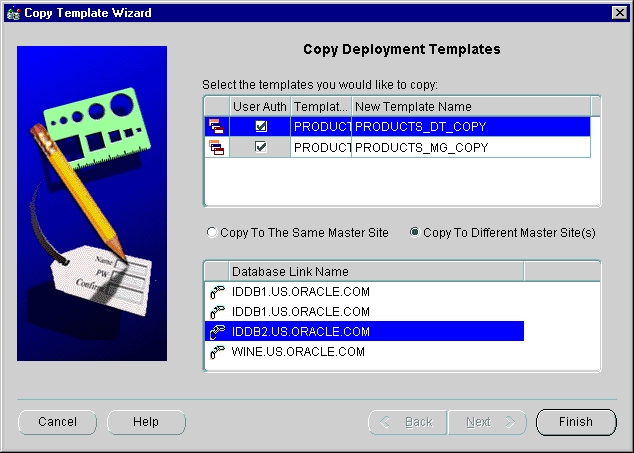
The Copy Template Wizard guides you through copying a deployment template. You may need to copy them to multiple master sites for various reasons. For example, you may want to:
Run the Copy Template Wizard from the master site that contains the deployment template. To open the Copy Template Wizard, choose Template > Copy from the menu bar.
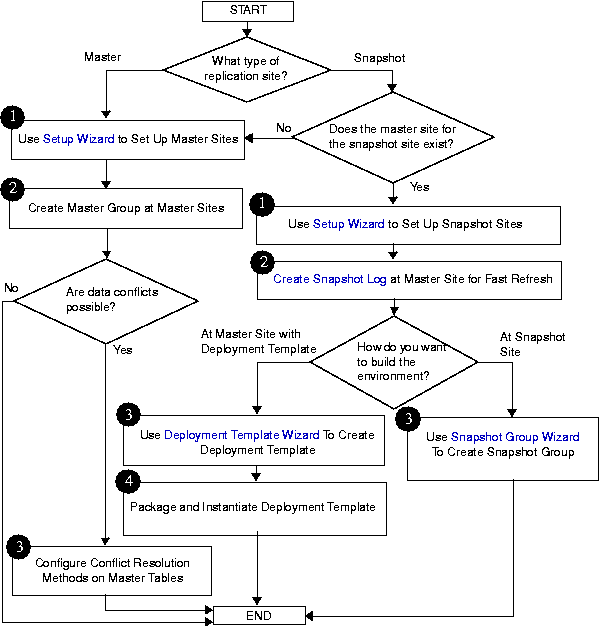
The flowchart in Figure 8-11 displays the major decisions and tasks that are involved when you create a replication environment using Replication Manager. The flowchart shows the major decisions and steps for building both multimaster and snapshot environments. Each task in the flowchart includes a cross reference to a section in this book that provides more information about the task. Detailed instructions about for completing these tasks are in the Replication Manager online help.
|
|
 Copyright © 1996-2000, Oracle Corporation. All Rights Reserved. |
|