Overview
X-Ray Spex Tutorial
So, you have a NetBeans build sitting around, are thinking about
writing a module, and are wondering...well, what is NetBeans doing
as it stands (that I can change)? Looking through the APIs can give
you details about how each little piece works, but you may want a
tour of the Open APIs to see how they all fit together in the
application.
This "x-ray" tutorial is based on the standard NetBeans
tutorials for new users. They are an excellent example of the kinds
of operations that end-users normally work with. In italics
is the regular tutorial; as commentary on each section, there is a
description of what APIs are really being used and how. The original
tutorial is a little out of date now, but generally only in superficial
ways.
These descriptions are not intended to be 100% complete in the
way that a Java-level trace would be. Rather, they should give you
the basic idea of how the APIs are being used in context. If you
need all the details, then of course a Java debugger or
profiling/tracing tool would be more appropriate. Similarly, the
real implementation code sometimes uses a slightly different
approach than is described here, whether for efficiency or for
special UI purposes; however, as a rule the described calls are
functionally equivalent.
Tutorial One : The Clock
For this tutorial, we will start with a simple clock form, making use of the
built in TimerBean. Once we have this clock compiled and running successfully,
we will then extend its functionality, adding the ability to set the time, and
change the time and date format.
Let's start with the basic clock.
PART ONE - the Clock.
Startup :
- Click the "New" icon on the Main Window. The Templates dialog will open, displaying
available templates grouped into four categories. Flip to the Swing Forms panel, select
JFrame, and click OK.
The
NewTemplateAction
is a
SystemAction
which is always
enabled
(when installed on the Main Window).
It is the general method of creating new objects from template. The
first thing it does is pop up a
tree view
of the Templates subdirectory of the
system file system,
which may be obtained easily via
Places.Folders.templates().
It specially looks for
DataObjects
which are
templates.
Step back - where did these "templates" come from? Well, modules can
add new templates when they are
installed.
On disk or in XML layers, they are just meaningless files as far as Java is
concerned. But once loaded into the system file system, they are
(hopefully) recognized by a
DataLoader
installed into the system's
DataLoaderPool
by some module or another using a
manifest tag.
In this case, the JFrame.java template file is installed
by the Form Editor's XML layer, and has an
associated JFrame.form file, so it is recognized by the
Form Editor's loader as a form. It is also marked as a template using
file attributes.
When the correct (Form) DataObject is created, it
is given a type of
DataNode
to represent it to the user. This node provides an
icon
and
display name
to make it more presentable.
- A dialog requesting the new object's name and location will open. Expand the directory structure
using the node icon (depending on the Look & Feel you are using, this icon is either a "+" or a bullet),
choose \NetBeansDir\Development\examples
as the location, (where \NetBeansDir is your NetBeans installation directory)
and type ClockFrame in the Object Name field. Click OK when done.
Again, a file selector is used to choose the destination
directory (a
DataFolder
on
some file system)
and a name may be chosen (or
defaulted
by the data object). The selector is invoked on the Repository,
filtered
to only display directories.
The data object's
handleCreateFromTemplate(...)
method is called to actually do the creation. In this case, the
templated form's data object is a kind of
MultiDataObject;
so, the JFrame.java file within it is in turn asked to
create itself
from template. The implementation of Java source files in the Java
Sources module specifies that their file entries should in fact be
FileEntry.Formats,
so that "magic" keywords such as __PACKAGE__ will
automatically be substituted in the result. The regular behavior of
file entries during creation from template is of course just to
copy the file in the file system; formatted files do much the same
thing, after substitution, and use calls such as
FileObject.createData(...)
and
FileObject.getOutputStream(...)
to actually copy the data.
- You should see the status line of the Main Window read "Opening Form : ClockFrame"
Several windows will open - the source Editor, the FormEditor and the Component Inspector.
Note there are colored sections of the source in the Editor - these sections are those
re-generated by the FormEditor, and may not be modified.
After the new form is created from template (and stored into
some user development folder), a few post-initialization steps are
taken by
InstantiateAction.instantiateTemplate(...).
First, the data object's
DataObject.getNodeDelegate()
is found (i.e. created). This is checked for a
customizer component,
which in this case will not exist (none was specified). The last
check is to see if the node has a
default action
associated with it. The Java data object class, when creating its
node delegate, explicitly asks to make
OpenAction
its "default action", so that (e.g.) double-clicking on the node in
an Explorer window will open the source file in the Editor. The
action just looks for the node's
OpenCookie,
which is provided by
DataEditorSupport
or similar classes and handles the
details of constructing the Editor window, loading the document,
and many other things.
(TopManager.setStatusText(...)
can handle the message - this is done automatically by
DataEditorSupport in
messageOpening().)
It is up to the data object to specify how it will be opened;
the form data object takes the usual approach of using
DataEditorSupport or a similar support
to handle the details of opening an Editor window with the proper
content (just as a regular Java source file would), but also opens
its own special
TopComponents:
the Form Editor and the Component Inspector.
The "guarded" sections of the Java source (by default, with a
light blue background) are handled by special code in the Java
Source module (which the Form Editor module inherits). This code
actually creates a specialized editor support which
looks for special markings in the source file (such as
//GEN-BEGIN:initComponents) indicating where the
protected areas are.
CloneableEditorSupport.loadFromStreamToKit(...)
is used to detect these, remove them from the actual text, and then
actually guard the areas in the Editor using
NbDocument.markGuarded(...).
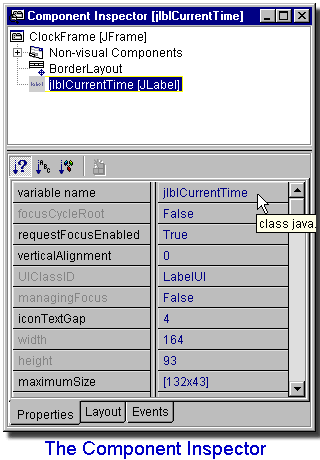
The Component Inspector lists all current Form Components and their properties. Initially
there are no components except for the default layout (BorderLayout) and a heading for
Non-Visible components - currently empty.
The details of how the component structure of a form is stored
on disk in *.form files is beyond the scope of the
APIs - this is determined by the Form Editor module. However, it
uses the APIs to then make this component structure accessible to
the user via
nodes.
Remember that the Form Editor defines the data objects for Java
forms, which include some code to specify what sort of node should
represent
them. A regular Java source file (as determined by the Java Source
module) has a node containing the structure of its source-code
elements
within it, e.g. the top-level class, its methods, etc. - these
subnodes are generally created using
SourceChildren.
A form node then adds an extra subhierarchy corresponding to the
AWT component structure of the form - all of these subnodes are
specially created by the Form Editor and directly mirror its
internal concept of the form as derived from the
*.form file (including
properties
corresponding to Bean properties of components, and
"meta-properties" like variable name, layout settings, and event
handlers).
So, the Component Inspector is almost "for free" after that - it
is just a regular
Explorer
window plus
property sheet
that is
rooted
on the proper "JFrame" node provided by the module. It exists for
UI purposes, but does not add functionality beyond the regular
Explorer.
Add a component :
- We will use a standard JLabel for our clock display. Flip to the Swing tab of
the Component Palette, you will see a grouping of common Swing components. Position
your mouse cursor over each icon to see a Tool-Tip identification.
The Component Palette is similar to an
Explorer view
in that it provides a display of the nodes in a special Component
Palette section of the nodes hierarchy (in the Session Settings),
which the Form Editor module creates. Each leaf node (JavaBean
component, or layout or border) internally contains the information
needed by the Form Editor to add such a component to the form. The
"tool tips" are really the node
short descriptions.
These nodes in the regular Explorer also allow the user to
create new folders (Palette tabs), and paste in JavaBeans from the
Repository (using
Node.getPasteTypes(...));
and the Install New JavaBean tool scans a JAR file for declared
JavaBeans, then just pastes them into the right area of the Palette
nodes, and
mounts
the JAR as a
new file system.
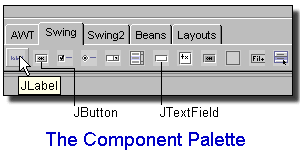
- Select JLabel by single clicking on its icon. The icon will appear "clicked",
indicating it has been selected, and is the active component.
The Component Palette, since it is embedded in the
main IDE window
as a toolbar, uses special code to indicate to the Form Editor
which component is selected. Normally, when code wishes to
determine if some node is selected (usually in an Explorer window),
TopComponent.Registry.PROP_ACTIVATED_NODES
(or related methods in the Window System API) is used - this only
works in a TopComponent, not in the Main Window.
- Place it on the Center
panel of the FormEditor surface by clicking once. You will see the generated code
appear in the Editor, and a new component listed in the Component Inspector. Note
the currently selected component is marked with blue corner anchor marks. The item
highlighted in the Component Inspector listing also indicates the selected component.
Naturally, all display within the Form Editor surface is
handled by that module. The new component is given a node, of
course, and this node is added to the hierarchy being displayed in
the Component Inspector, which will automatically redisplay to
accommodate it. For user convenience, it is also selected, which
may be done straightforwardly by calling
ExplorerManager.setSelectedNodes(...)
on the manager
associated
with that Inspector.
How is the code added to the Editor? The Form Editor already
"knows" which editor support it is using, though it
could easily find it anyway by
looking
for the
EditorCookie.
Now, the actual Swing Text API document being used for the source
code is available via
EditorCookie.openDocument(),
and generic Swing calls suffice to modify the text in it. To add or
remove guard blocks, or otherwise handle text in guard blocks, the
Form Editor may directly call
NbDocument.markGuarded(...)
and so on, though it would typically want to also keep track of
these blocks explicitly from the editor support so it
can name them and find the right one directly.
The
Java Hierarchy API
could also be used to perform these modifications, but that would
have the disadvantage that if the user was actively editing "inert"
source code elsewhere in the class while using the Form Editor, the
class might not be parseable (i.e. would not be syntactically valid
Java source), making it impossible to update with this API.
Modify the component's properties :
- Now we will modify the properties of the JLabel. Make sure the JLabel is selected,
either by clicking it in the Component Inspector, or by clicking it in the FormEditor.
Flip to the Properties tab of the JLabel in the Component Inspector - you will see all default
properties and values listed.
-
Click on the variable Name field. The cursor will appear in the variable value
field, ready to accept keyboard input. Type jlblCurrentTime into this field. To
set the new value, hit Return.
Remember, the Component Inspector is just an Explorer window,
so this is just displaying the regular node properties and making
some of them editable. The Form Editor window can affect its node
selection, according to components visually selected there. In this
case, the edited property is a "meta-property" for the variable
name, and the document containing the source code will be changed
in several places to reflect the new variable name.
- Next, find the text property - depending on the size of
your Inspector widow, you may need to scroll down to see all available properties.
Click on the property's value (currently set to a default of jLabel1) and enter the text to appear on the
Label - type 00:00:00. Again, hit Return to change the property to this new value.
You will see your text appear on the FormEditor.
- This JLabel will be the main display of our clock, so let's change the default font
properties. Click the Font property in the Component Inspector, and select the "..."
browse button which appears. A font properties dialog box will open. Change the
font face to Times Roman, Bold, 36 pt. You should see the default text (00:00:00)
on the FormEditor reflect your changes. Click close to dismiss the Font properties dialog.
The Form Editor does not need special code to handle this. The
Property Sheet by default just looks for the
correct property editor
for every node property; for this Swing component, the Swing
BeanInfo supplied with it probably does not specify a
property editor, so the Java
PropertyEditorManager
looks for a reasonable editor in the search path, and finds that the IDE
ships with
a property editor for java.awt.Font, which is
used. When the new value is set, the Form Editor
notices
the change and regenerates some code in the Editor window according
to the new
initialization code.
- Lastly, we will center the time display. Change the horizontalAlignment property
from its default value (LEFT) to CENTER.
In this case, the property is an int, so clearly
using the default property editor would be a poor choice - since
Swing does not do a better job, the IDE specially provides a
property editor for such properties using a list of named
selections.
This completes the visual aspect of the first stage of this tutorial. Now we will
add functionality to this form, by adding the TimerBean, and adding some code.
Functionality - Adding Code :
- First, we will add some imports to the code. Switch to the Source Editor, and scroll
to the top of the code. This form will require the standard date and time
imports. Copy the following code, and paste it into the Editor,
directly under the line reading "package examples;".
import java.util.Date;
import java.util.GregorianCalendar;
import java.util.Calendar;
import java.text.SimpleDateFormat;
We will also use the standard JOptionPane for error messages :
import javax.swing.JOptionPane;
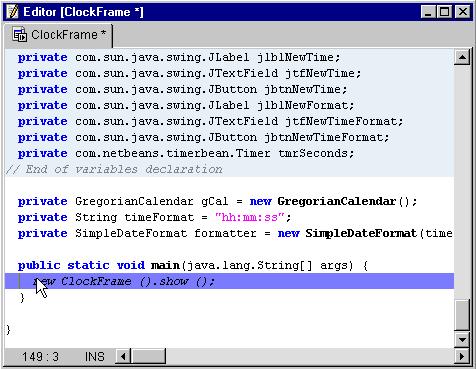
- Add the following below the "Variables Declaration" block
towards the end of the code (below the protected FormEditor code, marked with the
colored block).
private GregorianCalendar gCal = new GregorianCalendar();
private String timeFormat = "hh:mm:ss";
private SimpleDateFormat formatter = new SimpleDateFormat(timeFormat);
User edits of this sort leave the APIs inactive - they entirely
fall within the scope of the Editor in use, and its
StyledDocument.
Add the TimerBean, and set an event handler :
Compiling and Executing the form :
- The basic clock is now complete. Select the Execute icon from the Main Window. Watch
the Status Bar of the Main Window, you will see the progress of the operation. First
your Form and code are saved, then compiled.
Quite a bit is happening here in the APIs to make it so easy
for the user! First of all, the
ExecuteAction
is a
CookieAction,
meaning that it automatically enables or disabled itself (and its
toolbar
presentation)
depending on whether the selected item is really supposed to be
executable.
TopComponent.Registry.PROP_ACTIVATED_NODES
informs the action which node(s) is currently "selected" in some
TopComponent,
usually either an Explorer or Editor window (which is why you can
execute when you have the source file opened, or when you click on
its node to select it). The CookieAction
implementation then
checks
on that node to see whether it supports the desired cookie - in this
case,
ExecCookie.
Now, in the default IDE configuration, files should be compiled
before execution to make sure the test run is accurate. So, the
ExecuteAction checks for this flag in the Execution
SystemOption,
and finding "Run Compilation" turned on, first tries to compile the
JFrame source. This step is somewhat complex, as it
requires querying the file and perhaps the system to see how source
code should be compiled, then setting up a compiler job to do so
and running it - so you should refer to the
Compiler API
for all the details.
Starting the execution is pretty trivial - the action simply
takes the cookie it found and calls
ExecCookie.start().
But who specifies how to do this? The Java Sources module adds an
ExecCookie to data objects it creates (if they have
the proper main function, say). This cookie is
implemented by
ExecSupport,
which permits the user to choose from among standard
Executors
installed in the system - it may be used to
add node properties
to the data object's node representing the current choice (there is
a standard property editor which lists the choices in a
pulldown). The user can also set command arguments, etc.
The IDE automatically installs two executors into the pool,
since they are available in the APIs (not in modules):
ProcessExecutor
and
ThreadExecutor
(corresponding to external and internal execution, resp.). The user
of this tutorial did not specify which to use, so one is already
selected as the default, probably ProcessExecutor. Now
the ExecSupport when asked to run the frame, calls
Executor.execute(ExecInfo);
after some shuffling of flow of control through various parts of
the API implementation (to make sure the process is correctly
handled, I/O is redirected, and so forth),
ProcessExecutor.createProcess(ExecInfo)
is called which uses Runtime.exec(...) (via
NbProcessDescriptor.exec(Format))
to create the
process and run it.
- Assuming there are no errors, and compilation is
completed successfully, NetBeans will switch to the
Running Workspace and the form will open. Note that the Execution View, also open on the
Running Workspace, displays the ClockFrame as a currently running process.
Workspaces may be switched by using
Workspace.activate();
in this case, the ExecuteAction looks in the Execution
Settings for the name of the right workspace to switch to. The
Execution View is a core IDE feature - it is an Explorer window
opened on a special Environment node displaying all processes run
using the Execution API.
That's it!
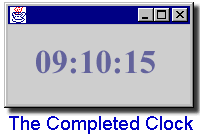
Again assuming there are no errors, your clock should be displayed, showing the
correct current time, with the seconds incrementing normally.
You've just built your first form !
To close the form, right-click on it in the Execution View, and select Terminate Process.
Note that while you can also terminate this form by closing the form window, this relies on
the WindowClosing event being set. The JFrame Template we used to build this form
has this event set to close the application as a default setting. Without it,
closing the window would not actually terminate the process.
The Execution View nodes have an action in their
popup menu
permitting the associated process to be terminated using
ExecutorTask.stop().
Tutorial Four : The Debugger
In this tutorial we will demonstrate the use of the debugging subsystem
of the IDE. We will use the completed code for one of the
earlier tutorials - part three of Tutorial One, the advanced version of
the Clock. The completed code for this tutorial (and all other tutorials)
is included with NetBeans, and can be found under Development/tutorial/ in the
NetBeans Explorer.
The Debugger allows you to set and remove breakpoints, watch variables,
track the state of threads, and more. All of this can be done in an easy
and intuitive graphical user interface.
Preliminary Setup :
- At a later stage in this tutorial we will need to access the included
Timer bean source. To make this source accessible to the IDE, we need
to mount it as a new filesystem. From the Tools menu on the Main Window,
select Add Directory. A standard Browse dialog will open, navigate to
your NetBeans installation directory, and select the sources subdirectory.
Click Mount, and you will see a new filesystem appear in the Repository.
This is also available as a popup menu under the
Repository node,
either as an explicit action, or as a
paste type - each
filesystem
installed
into the system appears as a potential addition. Selecting one
causes a new instance to be constructed and
mounted,
after which it is configurable as a Bean in the Property Sheet. The
standard actions for mounting
directories
and
JARs
also prompt the user to set their physical paths on the OS's disk.
Working with Breakpoints
- Close any sources and forms you may have open, and terminate any running
processes. Flip to the Editing Workspace, open an Explorer window, and
expand the Development\tutorial\clock hierarchy. We will use the final
stage of this tutorial - in the part3 subdirectory, double click on
ClockFrame to open this object in the Editor, Form Editor, and Component
Inspector.
- Click the Compile button on the Main Window, or use the Keyboard Shortcut
F9, to compile this source. You should see the Main Window status line
indicating the progress of this command.
(If you get a warning about a deprecated API, ignore it - it is
harmless in this case.)
The
CompileAction
works essentially the same way as the automatic compile discussed
above in the context of execution.
- In the Editor window, find the main method, and position the cursor on
the first line of the body (you can also use CTRL+g to "goto" the correct line).
We will
add a breakpoint to this line - select the Debug menu from the Main
Window, and choose Toggle Breakpoint. You could also use the keyboard
shortcut to do this, using CTRL+F8. You will see the line is
highlighted in blue, indicating a breakpoint is set on that line.
(Note that putting a breakpoint on the previous line, the one declaring the
method, will not work for main() - Java calls the body of main methods
in a special way for the debugger, and you cannot trace into it.)
In this case, the Java Sources module, in its specialized
version of EditorSupport,
notices
when its Editor window is active, and uses
CallbackSystemAction.setActionPerformer(...)
to make the
ToggleBreakpointAction
do the right thing. It must find where the user currently has the
cursor positioned in the document (as usual, the Swing
Document interface is used for this), then both
adds
a breakpoint to the current debugger implementation, and
marks
that line in the document internally as having a breakpoint (which
in turn actually
colors
the line in the Editor window).
- Let's start the debugging session. Again from the Debug menu on the
Main Window, choose Go, or press the keyboard shortcut F5. NetBeans will
switch to the Debugging Workspace, and two new windows will open - the
Debugger window, and the Output window.
The Output window is split vertically, the left hand panel displaying the
output of the debugged program, the right panel showing messages from the
debugger itself.
The
GoAction
does not do much itself. Basically, it makes sure the selected node
is debuggable by looking for a
DebuggerCookie;
spawns a new thread (since the debugging should be started as soon
as possible, but may take a while to "warm up"); automatically
compiles the file in the same way as mentioned above for execution;
and finally hands off the real work to
DebuggerCookie.debug(...).
Normally this cookie will be implemented by an
ExecSupport
(a very useful cookie support to use!), which gets the
correct
DebuggerType
describing how to launch the process in the debugger, which in turn
gets the
system debugger,
then goes ahead and
starts it.
It is up to the installed Debugger module to determine exactly
what to do during debugging, provided it implements the basic
Debugger
interface
to permit itself to be controlled in a few ways by other components
of the system. In this case, it is using the Execution API to run
the external JDK debugger (and
display
results in the Output Window); switching to the Debugging workspace
(as described for execution); and opening a custom Explorer view in
the form of the three-tabbed Debugger Window (actually displaying
the contents of a special Environment node created by the module).
The Debugger window is used to manipulate breakpoints, watch program
variables, and the state of threads. These are each displayed under a
seperate tab. Currently under the Breakpoints tab you will see the
breakpoint we have just set, listed by source name and line number.
Breakpoints and watches are specified in general terms by the
Debugger API;
however the debugger module is providing nodes to represent them
visually to the user (and present an alternative way of organizing
and editing them). These nodes may provide whatever structure the
debugger implementation needs, although since breakpoints and
watches are actually configurable as JavaBeans, using
BeanNode
would actually suffice for most of the display. Threads and thread
groups are not specified by the API, so the debugger has its own
representation of these which it displays in specific ways (with
children for the call stack, locales, and so on).

- You will see several messages from the debugger in the Output window,
then the debugger will halt at the breakpoint in the main method. The
blue-highlighted line in the Editor will change to pink to indicate where
execution has halted.
When the debugger halts at a breakpoint, it
notifies
the system of this, and also finds the Java source file where the
breakpoint was set - for example, using
Repository.find(...) - and
then
gets the line
where the breakpoint was set (this cannot be done just by jumping
to the desired line in the Editor, since the user may have added or
removed lines of text since the last compilation!), and uses
Line.markCurrentLine()
to indicate that the debugger is stopped at that line (which is
also visually displayed with
NbDocument.markCurrent(...)).
At this point you can continue (F5), Trace Over the current line (F8),
or Trace into the function called on the current line (F7). We wish to
step into ClockFrame, so push F7, or select Trace Into from the Debug
menu on the Main Window.
- You will see another line of Output from the Debugger in the output window, and
the Editor window will jump to the constructor of the ClockFrame class, and
again halt. You should see a pink highlighted line where the debugger is
currently stopped. Again you can continue, Trace Over, or Trace into the
initComponents() function. Trace Over.
You will next break at the first of the three variable declarations
manually entered when creating the tutorial (private GregorianCalendar
gCal ...). Push F8 to trace over this; Trace over both others by
pushing F8 twice more.
All of these actions simply invoke the proper method on the
Debugger
interface, the implementation of which controls the JDK debugger
agent (in this case).
The pink line highlighting the current point in the code should now be
at the line reading "initComponents ();". Push F7 to
trace into this. Hit F8 twice until you are halted on the line where
the instance of org.netbeans.examples.lib.timerbean.Timer is created, press F7 to
step in. Assuming you have mounted the sources directory as a
Filesystem as described in the Preliminary Setup section, the Timer
source will open in the Editor window, and the Debugger session now
steps into it, the pink highlighted line indicates the point in the
source where the Debugger is stopped.
Note that when you trace into files that are not yet opened,
but that exist in source form on some filesystem, they will be
opened for you using
EditorCookie.openDocument().
- Press F5 to continue, the ClockFrame will open and run.
- Find the tmrSecondsOnTime() method in the ClockFrame source,
and set a breakpoint (CTRL+F8) on the line declaring the method. The
next time the program flow goes through this point, execution will halt,
and the blue breakpoint line will turn pink.
Watching Variables
- Flip to the Watches tab of the Debugger window. Here you can "watch",
or monitor, the values of individual variables during execution. To add
a new watch, select Debug | Add Watch from the Main Window;
alternatively, right click on the root item of the Watches tree on the
Watches tab of the Debugger window, and select Add Watch. A dialog
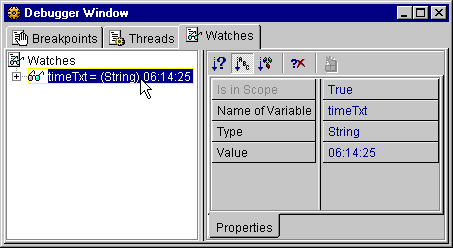
requesting the name of the variable to watch will open - type timeTxt
and click OK. timeTxt will appear in the Watches tree in the Debugger
Window, select by clicking once on it to see its properties displayed in the
property sheet, including its current value.
This is an example of how the Watch nodes in the Debugger node
hierarchy have special behavior to add or remove watches, and alter
the properties of existing ones. A more complex debugger could add
more special behavior to these, for example watches representing
expressions.
- Push F5 to continue the debugging session. After one second of execution,
tmrSecondsOnTime() will be called again, and execution will again halt. The
value of timeTxt displayed in the Debugger window will update (increment by
one second).
- It is possible to watch multiple variables simultaneously - simply add a
watch as previously. All watched variables are listed in the Debugger
Window. You can delete watched variables by selecting them in the
Watches tree and pressing the delete key, or by selecting Delete from
the popup menu. If a variable is not in the current scope, it does not
display any value.
As you use F5, F7 and F8 to continue, step into and step over the code respectively,
you can monitor the values of the watched variables at each stage.
Note that, as suggested above, much of the interesting behavior
of the breakpoints and watches can be fully captured with a
completely generic BeanNode, if nothing more complex
is provided: here, the current value of a watch is accessible to
the system (as well as the node representative) via
Watch.getAsText(),
and standard Java property changes are fired on
Watch.PROP_AS_TEXT
whenever this text changes.
Threads
- Under the threads tab of the Debugger window, the current state of all
threads of the program are listed.
Other Features
- The state of the debugging session, including breakpoint locations and
watched variables, is preserved across sessions, it is not necessary to
explicitly save the session.
Both
Breakpoint
and
Watch
are serializable, and the set of them is stored using serialization
while the IDE is shut down (the IDE core handles this
automatically); it is even possible that a single set of
breakpoints and watches be reused between two different debugger
implementations (modules), if no special customizations are made to
these objects.
- To end a debugging session, select Debug | Finish Debugger from the Main
Window, or use the keyboard shortcut CTRL-F5.
Again, this action just calls
Debugger.finishDebugger()
and the debugger implementation handles the details of stopping the
process, cleaning up the "current line" marks in the Editor window,
and so on.
- You can customize the Debugging subsystem from the Explorer, under
Control Panel | Debugger, and select Properties from the popup.
Like any module, the Debugger module can provide customizable
behavior using the
Options API;
in this case it provides JavaBean properties to configure such
aspects as whether editor tracking should be enabled, etc.
Built on December 12 2001. | Portions Copyright 1997-2001 Sun Microsystems, Inc. All rights reserved.