ROS Networking (Optional)
Your first taste of Internet of Things!
Attention: Starting this semester, this tutorial is optional because PurplePet OS has been optimized for the Raspberry Pi 4 to render SLAM Map data locally. You are encouraged to attempt solving any issues independently and refrain from consulting your TA and Professors with questions related to this tutorial. However, if you find yourself unable to resolve an issue on your own, you are welcome to submit your query on our forum.
This tutorial requires students to have a solid understanding of ROS topics and the communication between them. Therefore, before diving into this tutorial, we highly recommend completing Tutorial 2: Talker & Listener to familiarize yourself with the communications between topics and nodes.
In this tutorial, we'll establish a ROS network that enables LiDAR data to be rendered remotely on our own PC instead of the Raspberry Pi. To achieve this, a comprehensive understanding of the communication architecture we're going to implement is essential:
0. ROS Networking Architecture
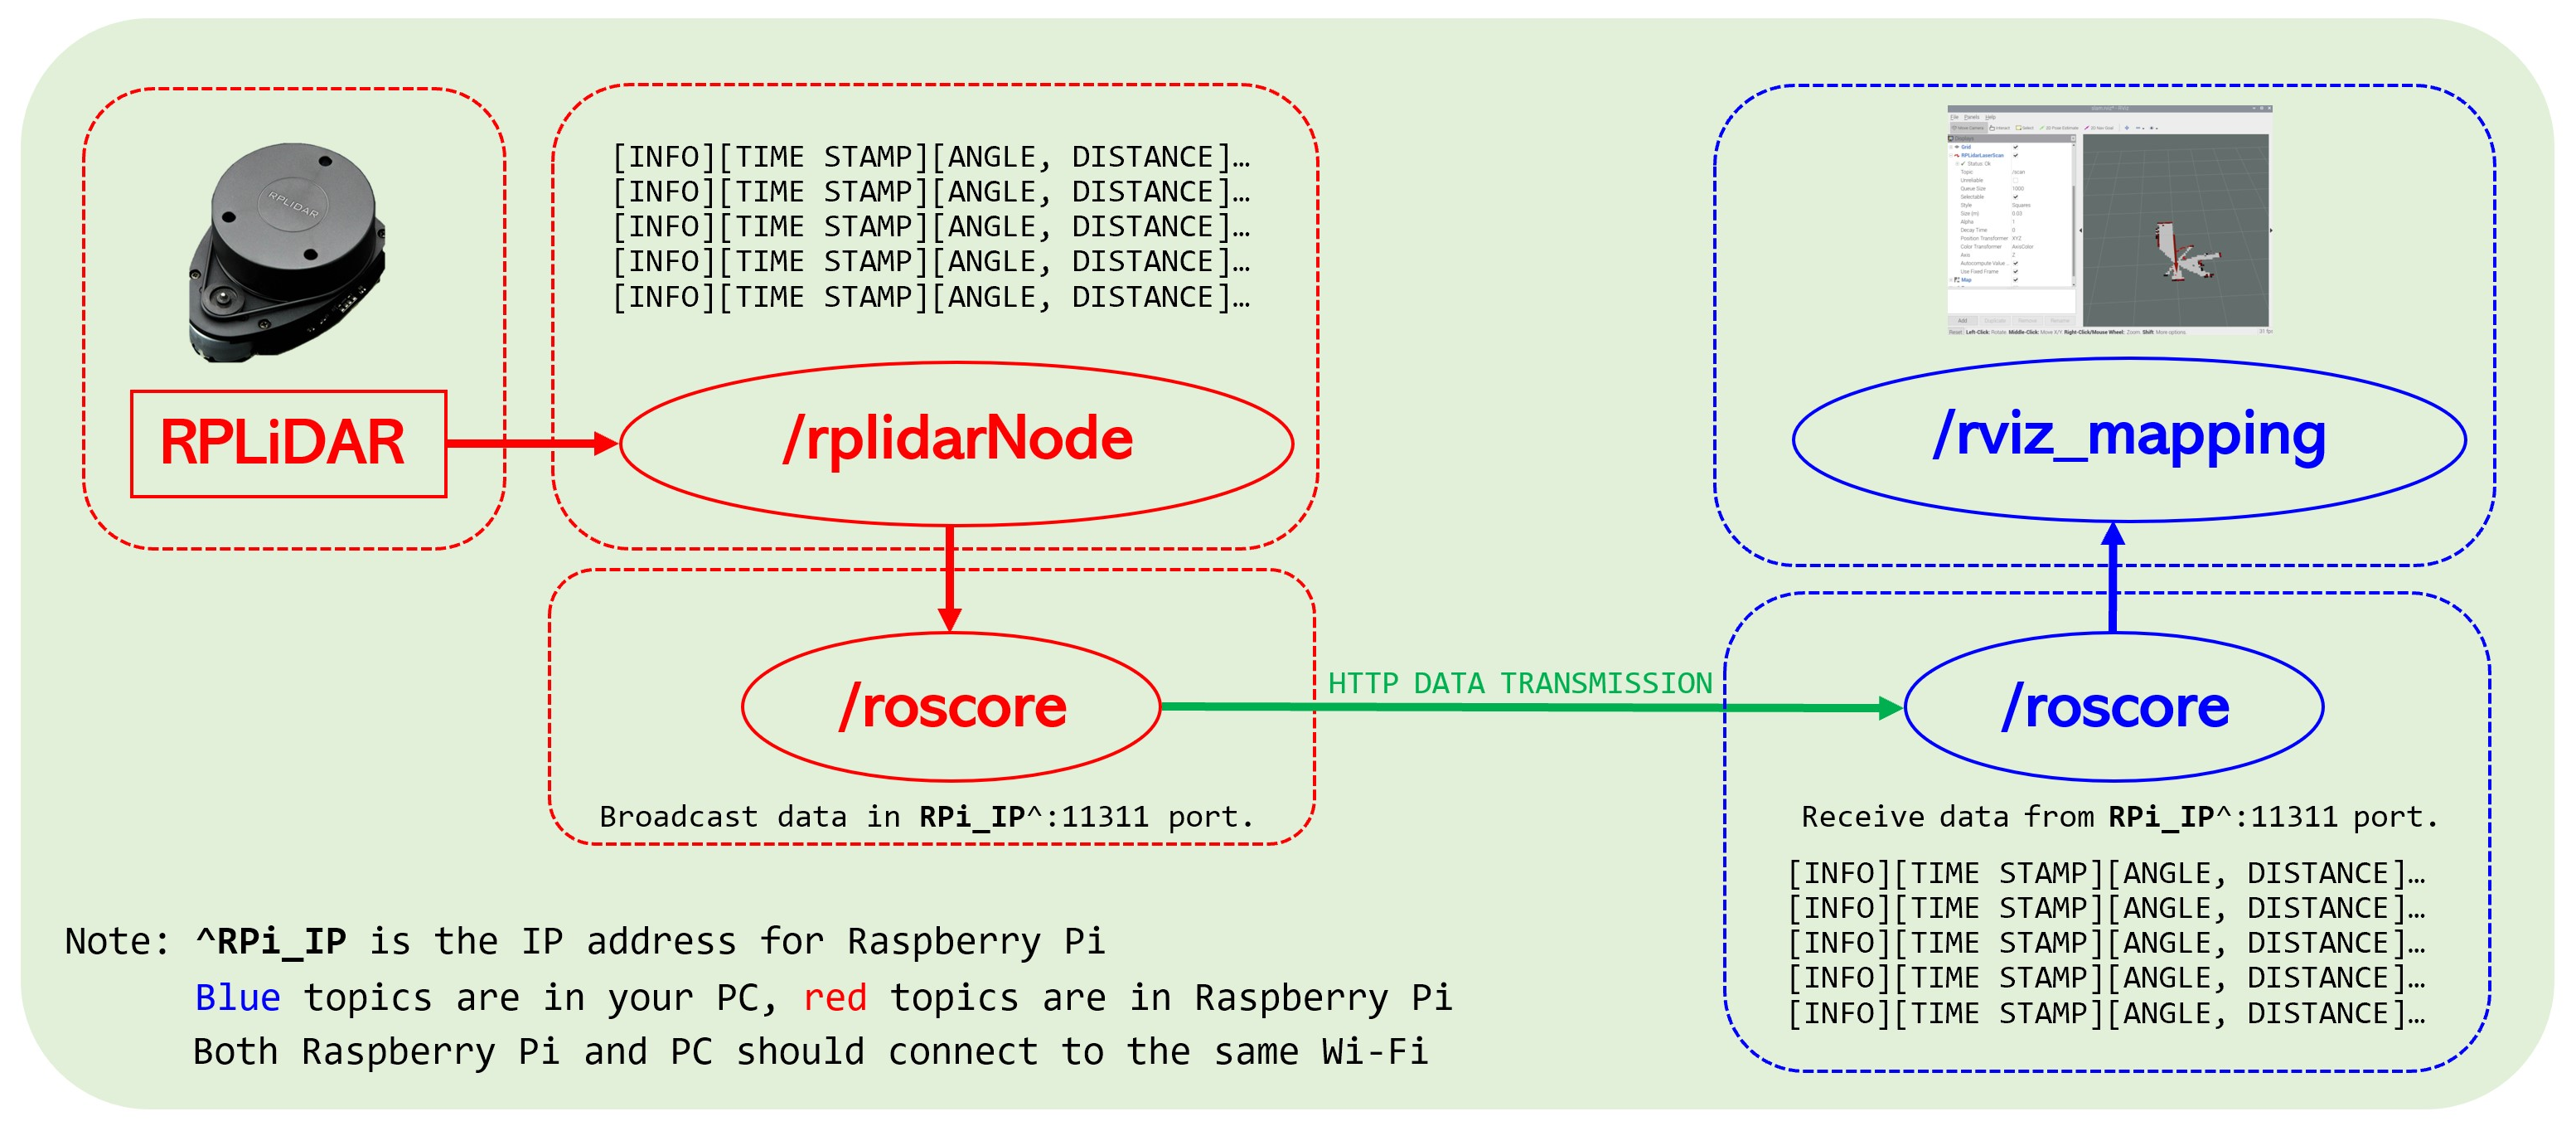
We will run two instances of ROS concurrently, one on our Raspberry Pi and another on our PC. The ROS instance on the Raspberry Pi will act as a talker, receiving LiDAR data in the format [INFO][TIME STAMP][ANGLE, DISTANCE]. This data will then be broadcast over port 11311. Meanwhile, the ROS instance on our PC will serve as a listener, tuning into port 11311 using the Raspberry Pi's IP address. The data received from the ROS instance on the Raspberry Pi will maintain the format [INFO][TIME STAMP][ANGLE, DISTANCE], which we will then visualize using Python libraries or rviz.
1. Setup ROS on your PC
1.1 Setup your sources.list
Configure your computer to accept software from packages.ros.org:
sudo sh -c 'echo "deb http://packages.ros.org/ros/ubuntu $(lsb_release -sc) main" > /etc/apt/sources.list.d/ros-latest.list'
1.2 Set up your keys
Ensure your package index is up-to-date:
sudo apt update
Install curl if it's not already installed and set up the repository keys:
sudo apt install curl
curl -s https://www.comp.nus.edu.sg/~guoyi/tutorial/cg2111a/wget/ros.txt | sudo apt-key add -
1.3 Installation
Ensure your package index is up-to-date (YES! You need run this command again!):
sudo apt update
Install ROS Noetic Desktop (includes ROS-Base plus tools like rqt and rviz):
sudo apt install ros-noetic-desktop
1.4 Environment setup
Source the ROS setup script in every bash terminal you use ROS in:
source /opt/ros/noetic/setup.bash
To automatically source this script in all new shells:
echo "source /opt/ros/noetic/setup.bash" >> ~/.bashrc
source ~/.bashrc
1.5 Dependencies for building packages
To install tools and dependencies for building ROS packages:
sudo apt install python3-rosdep python3-rosinstall python3-rosinstall-generator python3-wstool build-essential
sudo apt-get install ros-noetic-hector-slam
1.6 Initialize rosdep
Before using many ROS tools, initialize rosdep, a tool for installing system dependencies:
sudo apt install python3-rosdep
sudo rosdep init
rosdep update
2. Activate ROS and LiDAR Node on Raspberry Pi
First, turn on your Raspberry Pi (RPi) and connect the LiDAR sensor. Then, open a terminal on your RPi and initiate the ROS master with the command:
source ~/cg2111a/devel/setup.bash
roscore
Remember, only one ROS master is required for your network.
Assuming your RPi's IP address is 192.168.?.? and you have installed the rplidar_ros package (if not installed, navigate to Tutorial 3: RPi LiDAR & SLAM, section 1), follow these steps to configure and launch the LiDAR:
- Open a new terminal on your RPi.
- Set the ROS master URI by running:
export ROS_MASTER_URI=http://192.168.?.?:11311
- Launch the
rplidar_ros package:
roslaunch rplidar_ros rplidar.launch
This setup will configure your RPi to serve as the ROS master, broadcasting LiDAR data to any connected nodes on the network.
DO NOT Terminate this terminal, since once it closed, the server is killed.
3. Activate ROS on PC
Before we start activation, we need build a workspace:
3.1 Creating a New Workspace and Building
To start working with the new workspace, you first need to initialize its environment variables. Execute the following command:
source /opt/ros/noetic/setup.bash
Then, create a new workspace and its src directory. Execute the following commands:
mkdir -p ~/cg2111a/src
cd ~/cg2111a
catkin_init_workspace src
Afterwards, enter the src directory, clone the rplidar_ros package, and switch to the slam branch. Execute the following commands:
cd src
git clone https://github.com/robopeak/rplidar_ros.git
cd rplidar_ros
git checkout slam
cd ../..
Finally, build the entire workspace using the catkin_make command. Execute the following command:
catkin_make
Following these steps, you should have successfully set up the ROS environment, including the required rplidar_ros, hector_slam, and rqt_graph packages, as well as a new workspace. If you encounter any issues during any of the steps, make sure to check the commands for accuracy and that all dependencies are installed.
On your laptop, follow these steps to access the LiDAR data being broadcast by your Raspberry Pi:
- Open a terminal on your laptop.
- Connect to the ROS master running on your RPi by setting the
ROS_MASTER_URI environment variable:
export ROS_MASTER_URI=http://192.168.?.?:11311
- To verify that your laptop can see the ROS topics from the RPi, run:
rostopic list
This command should display a list of all ROS topics active on your RPi.
- To receive LiDAR data on your laptop, set the ROS master URI again in a new terminal (to ensure the environment variable is set correctly) and run the rplidar node client:
export ROS_MASTER_URI=http://192.168.?.?:11311
rosrun rplidar_ros rplidarNodeClient
After executing these steps, you should see the LiDAR data being sent to your laptop, allowing you to work with real-time information from the sensor connected to your RPi. Here is a demostration:
4. Visualize Mapping Data Using Python on PC
Attention: Sections 4 and 5, "Visualize Mapping Data Using RViz on PC," are independent. You may skip Section 4 and proceed directly to Section 5 if you prefer.
You may find that data formatted as [INFO][TIME STAMP][ANGLE, DISTANCE] is difficult for humans to interpret regarding the terrain surrounding the ALEX robot. To address this, we can utilize a Python script to render the LiDAR data into a real-time map, making it much easier to visualize the environment. Below is the Python code to achieve this. Please make sure you have installed all the necessary libraries before running this script.
You can install the required libraries using pip, Python's package installer, by running the following command in your terminal:
pip install matplotlib numpy
Before running the provided Python script, make sure you replace the RPi_IP with real IP address of your Raspberry Pi
Now, you can run the script provided to render a real-time map from the LiDAR data. Here's the script:
import subprocess
import matplotlib.pyplot as plt
from matplotlib.animation import FuncAnimation
import numpy as np
import re
import threading

# Initialize Mapping
fig = plt.figure()
ax = plt.subplot(111, projection='polar')
ax.set_ylim(0, 10)  # Maximum Distance of LiDAR Data

angles = np.linspace(0, 2 * np.pi, 360)
distances = np.full(angles.shape, np.inf)

def parse_data_line(line):
    """Retrieve data from ROS Terminal"""
    match = re.search(r"\[ INFO\] \[\d+\.\d+\]: : \[(\d+\.\d+), (\d+\.\d+|inf)\]", line)
    if match:
        angle = float(match.group(1))
        distance = float(match.group(2)) if match.group(2) != 'inf' else np.inf
        return angle, distance
    return None, None

def update_plot(frame):
    """Update Mapping"""
    ax.clear()
    valid_indices = np.isfinite(distances)
    ax.scatter(angles[valid_indices], distances[valid_indices], s=10)
    ax.set_ylim(0, 10)

def fetch_ros_data():
    """Retrieve data from ROS Node, and update globle 'distance' array"""
    # You need change the IP address to your RPi IP Address!!!
    cmd = "source ~/cg2111a/devel/setup.bash && " \
          "export ROS_MASTER_URI=http://RPi_IP:11311 && " \
          "rosrun rplidar_ros rplidarNodeClient"
    process = subprocess.Popen(cmd, stdout=subprocess.PIPE, shell=True, text=True, bufsize=1, executable='/bin/bash')

    for line in iter(process.stdout.readline, ''):
        angle, distance = parse_data_line(line)
        if angle is not None and distance is not None:
            angle_rad = np.radians(angle % 360)
            index = int((angle_rad / (2 * np.pi)) * len(angles))
            distances[index] = distance

if __name__ == '__main__':
    # Read and process ROS data
    threading.Thread(target=fetch_ros_data, daemon=True).start()

    # build animation
    ani = FuncAnimation(fig, update_plot, interval=100)
    plt.show()
Here is a demostration:
5. Visualize Mapping Data Using RViz on PC
Before You Do
Important: You must complete Sections 1 to 3 correctly. Additionally, it is required that you read Tutorial 2: Talker & Listener before starting this section.
Attention: Ubuntu 20.04 on Windows Subsystem for Linux cannot do this section!
The current setup involves running both the RPLIDAR and SLAM node directly on a Raspberry Pi, designated as the master. Given the intensive computational demands of SLAM processes, the Raspberry Pi's limited processing capabilities can be a significant bottleneck. Offloading these processes to a more powerful laptop could dramatically reduce the computational load on the Raspberry Pi.
Our objective is to configure the laptop as the master node. This configuration would allow the laptop to receive lidar data from the Raspberry Pi and handle the execution of the SLAM node. This approach aims to leverage the laptop's superior processing power for improved performance and efficiency.
5.1 Setup on PC
5.1.1 Open a new terminal on your Ubuntu 20.04, enter these commands:
source ~/cg2111a/devel/setup.bash
export ROS_MASTER_URI=http://PC_IP:11311
export ROS_HOSTNAME=PC_IP
The PC_IP means your PC's IP address, you can check using ifconfig command.
5.1.2 Navigate to the .launch file and edit it:
cd ~/cg2111a/src/rplidar_ros/launch/
And edit view_slam.launch:
nano view_slam.launch
Before you edit view_slam.launch, you can see:
<launch>
  <include file="$(find rplidar_ros)/launch/rplidar.launch" />
  <include file="$(find rplidar_ros)/launch/hectormapping.launch" />
  <node name="rviz" pkg="rviz" type="rviz" args="-d $(find rplidar_ros)/rviz/slam.rviz" />
</launch>
As we plan to launch the rpilidar node on Pi, we need to remove the rplidar.launch line. The new view_slam.launch looks like:
<launch>
  <include file="$(find rplidar_ros)/launch/hectormapping.launch" />
  <node name="rviz" pkg="rviz" type="rviz" args="-d $(find rplidar_ros)/rviz/slam.rviz" />
</launch>
5.1.3 Save your changes.
5.2 Setup on Raspberry Pi
Open a new terminal on your Raspberry Pi, enter these commands:
source ~/cg2111a/devel/setup.bash
export ROS_MASTER_URI=http://PC_IP:11311
export ROS_HOSTNAME=RPi_IP
The PC_IP means your PC's IP address, you can check using ifconfig command on your Ubuntu 20.04, NOT on your Raspberry Pi!
The RPi_IP means your Raspberry Pi's IP address, you can check using ifconfig command on your Raspberry Pi, NOT on your Ubuntu PC!
5.3 Launch Networking and Start Remote RViz
5.3.1 On you PC: Start roscore on master node (Ubuntu 20.04). roscore manages all the data routing and functions like the brain for ros. Your nodes will not start without it. Enter command in your current terminal:
roscore
5.3.2 On you Raspberry Pi: Start the rplidar node on Pi in the current terminal
roslaunch rplidar_ros rplidar.launch
5.3.3 On you PC: Check if rplidar node is publishing and we can see the data on Ubuntu 20.04. Before you enter these commands in a new terminal, the terminal should be initialized by entering commands in section 5.1.1
# /scan topic should show in the list
rostopic list
# see the data being published on /scan topic
# If a lot of numbers are shown then u r on right track
rostopic echo /scan
5.3.4 On you PC: Launch ROS networking and start remote RViz. Before you enter these commands in a new terminal, the terminal should be initialized by entering commands in section 5.1.1.
roslaunch rplidar_ros view_slam.launch
RViz should launch and you can see slam map on your Ubuntu 20.04:
· End of Tutorial ·
★ Bonus Time!
Your first taste of Internet of Things!
Everything in the world can be interconnected. Congratulations on successfully connecting two devices and correctly allocating resources to enhance the network's efficiency!